Install uBlock Origin Ad Blocker on Microsoft Edge

If you have been waiting for an Ad blocker for your Microsoft Edge browser, then uBlock Origin can be your best bet at the moment. The uBlock Origin ad blocker is officially available for Chrome and Firefox, but now the ad Blocker has been ported to Microsoft Edge. Here is how you can install uBlock Origin ad blocker on Microsoft Edge.
One thing you may want to note here is that this is a not an official release by uBlock, but this is the ported version of uBlock Origin that has been forked and released for Microsoft Edge by a developer called Nik Rolls. The project can be found on GitHub where the source has been posted.
The uBlock Origin Ad Blocker is compatible with the latest insiders version of Windows 10. Here is how to download and install uBlock Origin Ad blocker on Microsoft Edge.

Install uBlock Origin Ad Blocker on Microsoft Edge

Update: uBlock Origin Ad blocker is now available in Windows Store. So, you don’t have to download the unofficial zip file and then add it to Microsoft Edge.
To install uBlock Origin Ad Blocker in Edge do the following:
Note: To install uBlock Origin Ad Blocker you should be running Windows 10 version 15063.0 or higher on your PC.
Open Microsoft Edge and click the “More” (three dots top right corner) option.
From the options click “Extensions” and click “Get extensions from Windows Store“.
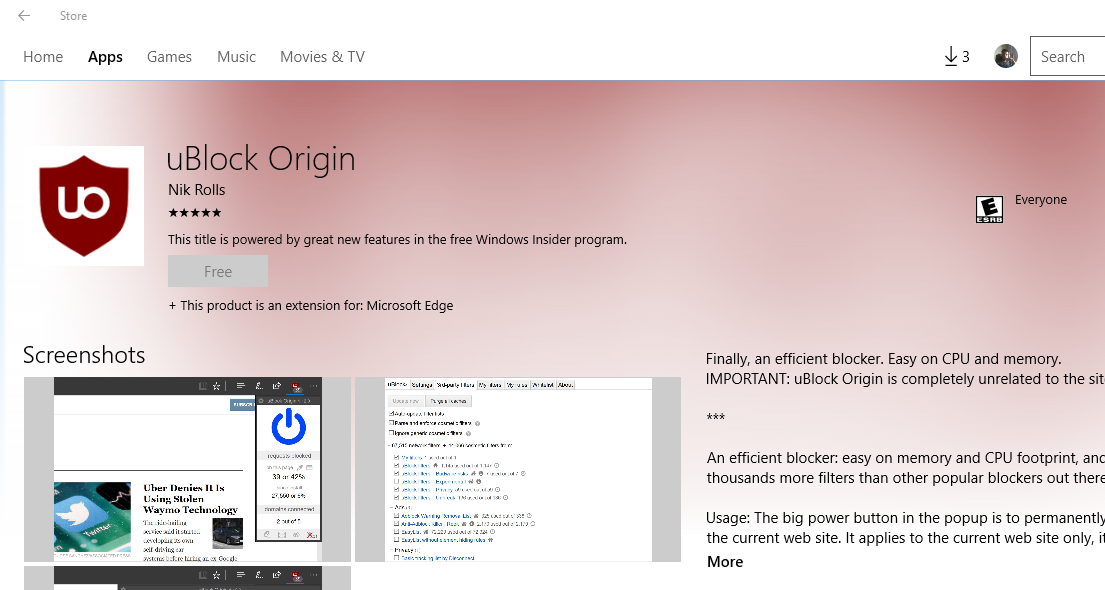
Now search for uBlock Origin and click on the result.
Click the “Free” button to download and install uBlock Origin ad blocker on Microsoft Edge. If the “Free” button is greyed out, that means you don’t have the required version of Windows 10.
That’s it. Once installed close Edge browser and restart it. You can view the installed extensions by going to More (three dots) > Extensions.
That’s it. You don’t need to follow the steps given below as they are not required anymore.
Begin with downloading the ad blocker file uBlock0.edge.zip from here. Once downloaded, extract the file to a folder.
Next, you have to load the extension to Microsoft Edge. To do this, open Microsoft Edge and in the address bar type about:flags and hit enter. Doing so, you are enabling the developer feature in the Microsoft Edge.
Now on Microsoft Edge Browser, click More (three dots) top right side and select Extensions.
From here select Load Extension and browse the extension folder where you have extracted the downloaded file. Select the extension folder and load the file.
Once you have selected uBlock Origin Ad blocker extension, you will be asked to enable it. Do it and you are good to go.
Things to note while using uBlock Origin Ad Blocker in Microsoft Edge:
As I said earlier this is not an official release, but a forked version of the official ad blocker that has been ported to Microsoft Edge. So there are a couple of issues that the users are experiencing while using the Ad blocker.
Issue 1: Since the plugin has been side-loaded to Microsoft Edge, it will be automatically disabled whenever you close Microsoft Edge. Which means, you have to enable it every time you want to use the Ad blocker.
Issue 2: Does not have all the features that you may find using uBlock Origin ad blocker on Chrome and Firefox including lack of Cloud sync which is not supported by Edge yet, lack of support for download from the extension and third-party list updates.
Apart from these issues, the plugin works fine on Microsoft Edge. It will be a handy tool until the developers release an official version for Microsoft Edge.

Find Lost Android Phones without Installing Any App

As the Android smartphones have become expensive due to the advanced feature they offer, the risk of losing your expensive smartphone to a thief is also on the higher side. So, in today’s post, I will show you how to find lost Android phones without installing any third party app.
There are several Android phone finding apps available on the Google Play that may help you find stolen or lost Android phone. However, in case you don’t want to use a third party phone-finding service, you can make use of Google’s own Find My Phone service known as Android Device Manager.
The Android Device Manager can help you locate stolen or lost Android phone remotely. It also allows you to lock or wipe the data from your phone remotely.
It comes in handy if you have dropped your phone somewhere or if you have been a victim of theft. Using Android Device Manager you will be able to wipe the device data remotely and can be sure that the data will not be in the wrong hands. The service can also help you locate your Android device if you have setup your Android device to be located remotely.
To be able to use Android Device Manager to locate your phone, you must enable the Android Device Manager on your phone first. Since it is a privacy issue, your should allow Google to access your device location by enabling the Android Device Manager feature.
There is another way to locate your stolen Android phone without using any third party app, but that is limited to Samsung users only.
I have discussed both the methods to locate stolen Android phones without using any third party app in this article below.

Find Android Phone with Android Device Manager

Android Device Manager is an inbuilt phone locating feature that comes pre-installed with almost all the modern Android smartphones.
As I said earlier, to be able to use Android Device Manager locate feature, you should first enable Android Device Manager feature on your mobile phone. Let’s see how to do it.
To enable Android Device Manager, do the following:
Old Devices: Go to Settings >> Security >> Android Device Manager.
New Devices: Go to Settings >> Google >> Android Device Manager.
Under Android Device Manager section, toggle the On/Off button for the following:
  • Remotely locate the device: Show location of the device on Android Device Manager.
  • Allow Remote Lock and Erase: If you lose your device you can remotely lock, or factory reset data with Android Device Manager.
Once you have successfully enabled Android Device Manager tool, you can locate the device using the Google Android Device Manager tool.
Go to Android Device Manager Tool and login to your Google account that you used to set up your Android device.
Google Android Device Manager
Upon a successful detection of your mobile phone, you will have three options. Ring, Lock, and Erase. If you want to find your phone in the office or at your home, you can make use of the Ring option.
The Lock feature will lock your device that can only be unlocked by providing Gmail ID and password that you use and erase would delete all the personal data on the phone.
You also have the option to add multiple Android devices using the same Gmail ID in case you have more than one Android phone.
Note: When you are trying to locate your phone, your phone (stolen/lost) must have an active internet connection to be able to locate the device.

Use Samsung’s Find My Mobile (Samsung Users Only)

If you own a Samsung Galaxy smartphone, then you can use the inbuilt feature called Find My Mobile. It allows the Samsung device owners to locate their Android phone in case its get stolen or if the owner forgets it somewhere.
To enable Find My Mobile feature, do the following:
Similar to Android Device Manager, you must first enable Find My Mobile feature on your phone to be able to locate the phone using Find My Mobile service. Here is how to do it.
Go to Settings >> Lock screen and Security >>Find My Mobile.
If asked to sing in using Samsung Account, do it. If you don’t have a Samsung account, then create one and then enable Find My Mobile service.
Once signed in successfully, enable below options under Find My Mobile:
  • Remote Control: Allow your device to be controlled remotely using your Samsung account via the internet.
  • Google Location Service: Allow the Google location service to find the location of your device.
To trace your stolen Samsung Android phone go to Samsung Find My Mobile Tool.
Samsung Find My mobile
Sing in using your Samsung ID and locate your device. You can also view the option to Erase and lock the device if you want to.

Change Time & Date Language Preference to English in Windows 10

If you have upgraded to Windows 10 recently and if you happen to be in India then by default the Windows 10 version will select Hindi as your preferred language. Now everyone in India may not know Hindi (read/write) though it is an official language (not national) of the country. Now if you want to change your preferred language from Hindi to English in Windows 10 here is how to do it.
Apart from settings the preferred language in Windows 10 as English there a couple of more functions for which you may have to change the language preference including Date and Time settings in Windows 10, web browsers such as Chrome language preference, etc. manually. As changing the preferred language for PC will not be applied to these settings.
In today’s post, we will learn how to set English or any other language as a preferred language in Windows 10. Also, I will also show you how to change language preference for date and time settings in Windows 10.

Change Time & Date Language Preference in Windows 10

Changing date and time language setting in Windows 10 would only take a minute or so. So let’s get started.
Click on Date and Time stamp that you can see at the end of the Taskbar.
When the Date and Time stamp opens, click Date and Time Settings.
It will open Time and Language tab under the main Settings window.
Now scroll down and go to Related Settings. From here click on “Additional date, time and regional settings”.
It will open Control Panel’s Language and Regionoption.
Under Region section, click on Change date, time or number format.
control Panel Regional settings
It will open a new dialogue box with Region settings. Under Format tab, click the Drop-down menu button and select the language that you want to set for Date and Time settings.
In my case, since I want to change the date and time language from Hindi to English, I will select English India.
Region Settings Windows 10 Control Panel
After selecting your preferred language, click on Apply and then on OK.
That’s it! You have successfully changed the date and time language to English from Hindi.

Change Windows Display/Default Language

If you want to change Windows Display language or what is commonly known as the default language in Windows 10, here is how to do it.
This can come in handy if your Windows 10 PC came with English or Hindi as the default language and you want to change it to something else or may be your national language. In such cases, here is how to do it.
Click on Start button and select Settings.
From settings, click on Time and Language.
Next, go to Region and Language tab.
Here you have the option to set your country or region. Below it, you can see Languages option.
If you want to add a new Language click on the + Add a Language button.
Now select the language that you want to set as Display language in Windows 10.
Once selected, you may need to download the selected language pack. So, click on the selected Language, click on Options and download Langauge Pack.
Time and Language settings set as Default
Once the language pack has been downloaded, the next step is to set it as the default language.
To do this, click on the selected Language and select set as Default.
Time and Language settings set as Default
That’s it! You have successfully set your preferred language as the display language.

Fix Common iPhone 7 Plus Problems

The iPhone 7 and the iPhone 7 Plus are out and are being rolled out to the world. At first glance, the iPhone 7 may not offer too much in terms of innovation, but the phone is better than its predecessor.
The iPhone 7 Plus does offer a better camera, better battery backup, better processor and of course the new chassis is water and dust resistant.
On the other side, Apple has omitted the 3.5mm Audio Jack from the phone making the much-rumored news finally official. It is a very annoying issue for a few who are used to wired earphone and headsets. But, the one who has been using Wireless headsets will notice the missing hole.
Of course, you can use the connector that came in the iPhone 7 box to connect your regular earphones.
Now with all these, there are some iPhone 7 and iPhone 7 Plus users who are making rounds of online tech forum with minor yet irritating common iPhone 7 Plus problems. I have also been checking these online forums for potential solutions.
So, here are the common iPhone 7 and 7 Plus problems and some potential fixes for them.

iPhone 7 Attempting Data Recovery Issue

iPhone 7 users on the official forum have reported that the phone is showing Attempting Data Recovery while trying to update to iOS 10.01 build.
If you are facing a similar issue, then don’t panic and leave your device idle until it completes the upgrading process. At times, the phone may take more than usual time to install the latest software and restore the data.
The issue seems only to occur if you are updating your iPhone using iTunes. There is no reported issue while upgrading through OTA (Over The Air). If that does not work, try the steps given below.
Note: Before you try any of these methods, make sure you give your phone required time to come out of attempting data recovery situation.

Force Restart iPhone 7

So, if your device isn’t recovering from attempting data recovery problem, then try to force restart your phone. Here is how to do it.
To Force Restart iPhone 7 and 7 Plus: Press and hold the Sleep/Wake + Volume down button simultaneously for ten seconds or until you see the Apple logo.
Now try to restart your iPhone 7 or iPhone 7 Plus. If the phone doesn’t restart plug in the charger and let it charge for few minutes.
You should see the charging screen with an hour at max. If that does not happen, make sure that you contact the Apple customer support for more help.

 If iPhone 7 and 7 Plus Stuck at Start Screen

While restarting your iPhone, the possibility is that the device might get stuck during the startup. If the device doesn’t boot even after a  long time or you see Apple logo or Blue / Green screen then do the following.
First, connect your phone to PC or Mac using iTunes. Open iTunes on your PC/Mac.
While the phone is connected to the PC, force restart it. To do this press and hold Wake/Sleep button + Volume down button simultaneously. Keep the buttons pressed until you see the Recovery Mode screen.
On iTunes, you will see an option to Restore or Update. Select Update and iTunes will reinstall iOS without erasing any data from your iPhone 7.
Nothing seems working? If nothing seems working, you may need to contact the Apple Customer care to get your device repaired. Do not tamper with your phone as you can easily get it resolved through the Apple customer care.

Problem Activating New iPhone 7 Plus

This is not a very unheard issue with the iPhone. During the initials days of the iPhone launch, some users may face peak server time and will not be able to activate their iPhones.
So, if you are getting any server related messages while trying to activate the phone, the possibility is that the Apple Server might be facing some problem. This is a temporary issue and trying again later will work out.
There are a couple of more things that you can try to fix this issue if the problem isn’t really from the server end.
  • Try to Turn Off and Turn on iPhone 7 and try again with the activation.
  • Change your data connection to WiFi from Cellular or vice versa.
  • Use iTunes to activate your phone using the computer or Mac.
  • If your iPhone is carrier-bounded, then contact the network operator and inquire about the problem.

Lightning Earpod Issue

Apple includes a pair of Lightning Earpods with every iPhone 7 and 7 Plus unit. Some users have reported the Lightning Earpods are causing problems while using Siri or Music.
The glitch in the software of the phone is causing the Music to pause while listening music over Lightning Earpods. It is also interfering with Siri’s working process and not allowing the users to use Siri.
Fortunately, Apple has said that they are aware of the issue and currently are working on a fix which will be released with a software update.

Having to Press the Home Button to Unlock

Apple did change the way the user unlock their iPhone with the iPhone 7 and 7 Plus. The new units come with a physical home button that actually requires you to press the button to unlock the phone.
Even though it is just a clever tweak at the work that gives the illusion of physical pressing, you can turn it off to get the old touch to open action back.
Go to Settings >> General >> Accessibility >> Home Button. Here toggle the switch that says “Rest Finger to Open.”
That’s it. Now all you have to do is simply rest your finger on the home button to unlock the phone.

iPhone 7 Plus Battery Problem

The iPhone 7 and the iPhone 7 Plus offer improved battery performance than its predecessors did. However, for some users, the difference is not noticeable or even worse.
The rapid battery draining issues in iPhone are relatively rare compared to other smartphone OEMs, but occasionally complaints pop-up and that needs to be resolved.
Defective Battery – The battery draining issue could be because of a defective battery that is not holding the juice for enough time. In such cases, you can ask for a replacement from the store. However, before that try these tips.
Heating Issue – Excessive heat can decrease the iPhone 7 battery performance, and you will end up with substandard performance. If your device is getting hot while on charge, then make sure you remove any cases on it and allow it to charge normally.
Low Power Mode – You can also use the Low Power Mode option given on the phone. It is recommended that you put your phone into Low Power Mode when it is idle. Such as when it is in your pocket or when going to sleep, put the device on Low Power Mode to conserve some power.
However, Low Power Mode disables Mail Fetch, Hey Siri, Background tasks and of course some visual effects when it is on.
Turn off Cellular Data – Accessing internet on the WiFi uses less power than the Cellular Data. So, whenever you are not using Cellular Data, keep it off. Also, put your device to Auto-Brightness to save some more power.
Check Battery Stats – Go to Settings >> Batteryand under Battery Usage check if any app is using an excessive amount of battery. Consider uninstalling or finding an alternative to the app if found culprit.

Problem with Network and Airplane Mode

Some users of the iPhone 7 have reported that the device does not show any service after turning off the Airplane Mode. This can be a software bug and can be fixed with a quick update.
As a temporary fix you can do the following:
Restart iPhone: This is the best fix suggested by the users who  are dealing with the problem. A simple restart can help your device recover from no service state to showing proper network signals.
Remove/Insert SIM Card: At times, even removing and reinserting your SIM card can do the trick. So, remove the SIM card and reinsert it properly.
Reset Network Settings: You can also try resetting the Network Settings in iPhone 7. To do this, go to Settings >> General >> Reset >> Reset Network Settings.
Fix Hotspot Shield Something Went Wrong Error

Hotspot Shield is one of the best VPN software you can install on your PC and Mac. While the Hotspot Shield itself works excellently on PC and Mac, at times, you may end up with Something Went Wrong Error while using it. Here is how to fix hotspot shield something went wrong error in Windows 10, 8.1,7 and Mac running MacOS Sierra, Yosemite, etc.
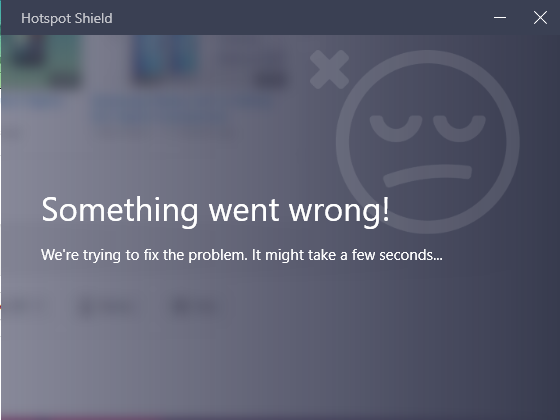
The Hotspot Shield something went wrong error suddenly started showing when I restarted my PC. When I tried to run Hotspot Shield, it was only showing “Something Went Wrong, we are trying to fix the problem. It might take few seconds”.
Even after waiting for a few minutes, the problem did not go away, and the Hotspot Shield did not start. It was stuck to the same error message stating “something went wrong.”
Fortunately, after tinkering for few minutes here and there, finally, I resolved the error and fixed hotspot shield something went wrong error.
If you are facing similar kind of error with hotspot shield here is what you can do to fix it.

Fix Hotspot Shield Something Went Wrong Error

hotspot-shield-something-went-wrong-error
Even though Hotspot Shield is available for Smartphones as well, all of the below-mentioned fixes won’t work on them. As some fixes require you to access hotspot shield files that are only visible on PC and cannot be accessed using smartphones.
These fixes are for Hotspot Shield running on Mac and Windows PCs and Laptops.

Fix 1: Restart Your PC

Though this is no fix, it can work at times. A Quick restart solves some of the annoying problems in PC. Something went wrong error may occur because the hotspot shield could not start properly and a restart might fix it.

Fix 2: Run Hotspot Shield Fix Me

Hotspot Shield Fix Me is an inbuilt application included in the installation file of the Hotspot Shield software. What it does is whenever a user faces a problem with Hotspot Shield, it runs itself to fix common problems.
If you have seen the error, it says, “Something went wrong, we are trying to fix it. It might take a dew seconds”. The software will run fix” me” application to fix the problem.
However, for an unknown reason, the Hotspot shield was unable to run the fix me program.
When I tried to run it manually, it finally fixed the something went wrong error. So, here is how to do it.
Close Hotspot Shield completely. Click on the Up-arrow icon in the taskbar, right-click on Hotspot Shield and select Quit.
hotspot-shield-quit
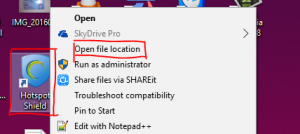
From your desktop screen, right-click on Hotspot shield icon.
Next, select open File Location. It will open the path location to C:\Program Files (x86)\Hotspot Shield\bin.
hotspot-shield-open-file-location
Here you have to search for the hssfixme.exe file.
hssfixme
Once you have found the file, double-click on hssfixme.exe to run it.
Note: If you don’t see hssfixme.exe file then click on View (at the top left) and check the option “Hidden Items” in show hide section.
Wait till the hssfixme.exe starts and fixes the problem. Once the problem is fixed, Hotspot Shield will start automatically.
There you have it. Now connect the hotspot shield to the internet and surf anonymously.

Fix 3: Reinstall Hotspot Shield

If nothing seems working, you can try reinstalling the Hotspot Shield. The problem could be with your hotspot shield software itself, and a reinstallation might just fix it.
Go to Control Panel >> Program >> Programs and Feature.
Select, Hotspot Shield, and select Uninstall.
Now reinstall Hotspot Shield, and see if the something went wrong error is fixed.

Fix Secure Connection Failed Error in Firefox & Chrome

Your Anti-Virus comes with a built-in feature to filter the SSL protocols for better safety. So, whenever you visit a HTTPS website using browsers like Firefox and Chrome, your Anti-Virus will try to filter them to create a secure connection. This is when you can face the “Secure connection failed” error message in Firefox and Chrome. Today, in this post, I will show you how to fix secure connection failed error message.
The error secure connection failed, only appear when you try to open any HTTPS website such as Gmail or Twitter or your internet banking site.
Now the error Secure connection failed does not appear because there is a problem with your Web browser. As the error can occur on any browser be it Firefox or Chrome or Edge, the culprit is something else.
In such cases even uninstalling and installing your web browser won’t help. So, don’t try doing it as a workaround.
The culprit here seems to be your Anti-Virus. For me, I am running the ESET Nod32 Anti-Virus, and the problem seems to be because of the Anti-Virus’s SSL Filtering Protocol feature.
So, if you are using the ESET Nod32 and are facing the Secure connection failed error, it is time to tweak some settings to get rid of this problem.  So, here is how to fix this problem in Firefox and Chrome.
Note: Even though I have mentioned Google Chrome and Firefox, the problem can occur on any web browser. Since it is an Anti-Virus program related issue, you can follow the steps to resolve this issue on any browser.

Why this Happens?

The only reason could be your Anti-Virus program not being able to import the root certificates due to some technical glitch. When the program cannot import root certificates, the website having secure protocols won’t be able to load on any web browser, because your Anti-virus will be blocking them. Ultimately showing the “Secure connection failed” error.

The Fix – Reset SSL Protocol Filtering

Fortunately, the fix is more simple than the error makes it appear to be. All you have to do is, reset the SSL protocol filtering feature in your Anti-Virus.
Note: These instructions are for ESET Nod32 Anti-Virus. If you are running any other Anti-Virus program, find the settings to turn off / on SSL protocol feature.
Note: I have also made a video showing how to fix the “Secure connection failed” error for easier understanding. You can skip the reading process and watch it by scrolling down to the end of this article.
Note: If you are facing the secure connection failed error on a non-HTTPS website, then you can try the fix it 2 in case the fix 1 doesn’t work.
Step 1: Begin by launching ESET NOD32 Anti-Virus program. If you are using it, you can open it from your system tray.
eset-nod32-sysem-tray-icon
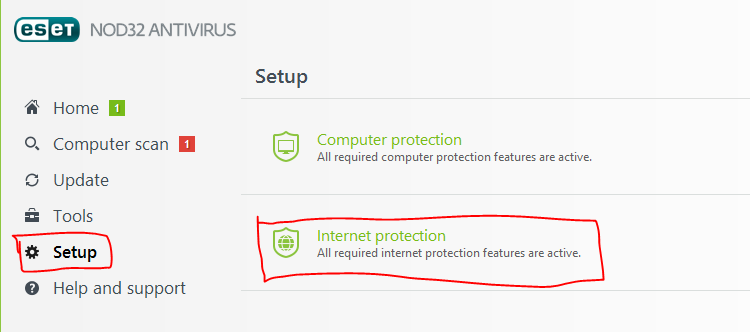
From the left pane, click and go to Setup. And then click on Internet Protection to expand the section.
If you are already in the Internet Protectionsection, then skip it.
eset-nod32-web-protection
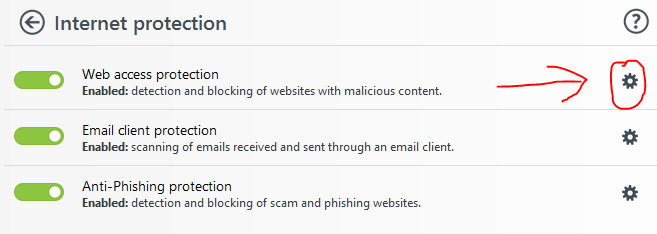
Click the Settings icon (Gear icon) beside Web Access Protection. It will open Advanced Setupwindow.
eset-node32-inetrnet-protection
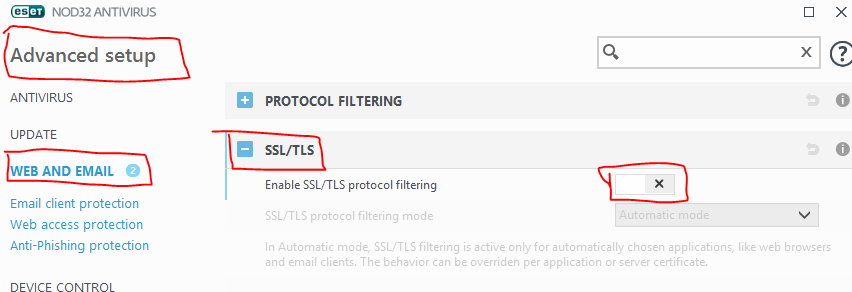
From the left-side pane, click Web and Email.
Next, expand SSL/TLS section by clicking on it.eset-nod32-off-ssl-filtering-protocol
Now toggle the slider beside “Enable SSL/TLS Protocol Filtering” to disable it. If all the options get grayed out, that means you have disabled it. Click OK to save the settings.
Step 2: Now you have to enable the SSL/TLS Protocol filtering feature again. So go to Advanced setup by navigating to Setup >> Internet Protection >> Web Access Protection (Click the Gear Icon) >> Web and Email.
eset-nod32-on-ssl-filtering-protocol
Now turn on “Enable SSL?TLS Protocol filtering” feature by sliding the toggle switch. Click OK button to save changes.
Now open Firefox or Google Chrome and try visiting any secure site to see if the secure connection failed error is resolved.

Fix 2: Fix Secure Connection Failed Error on Non-HTTPS Website

Now if you face the secure connection failed error while using a non-HTTPS website, then try this.
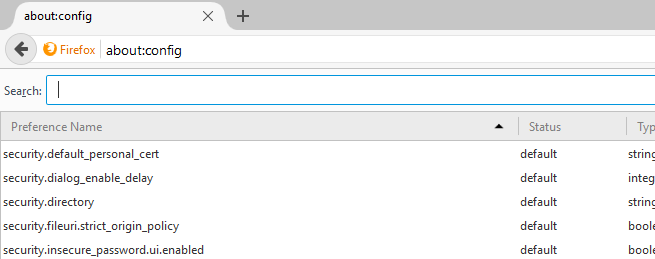
Open Mozilla Firefox. In the search bar, type  about:config and hit enter.
about-config-defaul
You will see “This might void your warranty” page. Click “I accept Risk” to proceed.
In the search bar, type security.ssl.enable_ocsp_stapling And hit enter. It will look for the entered query and return the result.
about-config-mozilla-firefox

Under the value tab, double click on security.ssl.enable_ocsp_stapling and you will see that the value has turned to False from True.

Disable Automatic Updates in Google Chrome

The earlier version of the Google Chrome browser allowed the users to choose whether they want to update their Google Chrome browser to a new version or not.However, with time, Google has changed the way updates are released for the browser and now the Google Chrome updates automatically. If you want to disable automatic updates in Google Chome, here is a tutorial showing how you can do it.
Disable automatic update in Google Chrome
Apart from Google Chrome, the latest browser to adopt this technique is the Mozilla Firefox web browser. The latest version of the Mozilla Firefox automatically updates to the latest version whenever it becomes available.
Now coming to Chrome, there can be several reasons why you don’t want to update to the latest version automatically, but prefer to have an option.
The main reason could be being not sure about the stability of the latest version. Also, you may see one of your favorite features from the current version of Google Chrome being removed in the latest version.
I personally like to update the web browsers or any other software program manually. This gives you the option to be sure about the stability of the latest version and later update manually. You can also disable automatic update in Windows 10 if you are running one.
There are several ways to disable automatic update in Google Chrome. However, we would begin with the easiest possible solution.

Disable Automatic Update from System Configuration

Google Chrome looks for any new version of Google Chrome every you restart the browser. To check for the update, Google Chrome uses two System Services namely Google Update (gupdate) and Google Update (gupdatem). So, to turn off automatic update in Google Chrome, we have to disable these Google services.
You can disable these services easily from the System Configuration window. Follow these steps to know how to turn off automatic updates in Google Chrome.
Note:  Turning off auto-updates should be done with caution.  You may not receive the latest security updates if you do not auto-update or manually update Google Chrome frequently.
Close the Google Chrome browser. Make sure you save all open tabs in Chrome if you want to restore them later.
Press Windows Key + R. It will open Run commanddialogue box.
Type, msconfig in the box and hit enter. It will open System Configuration Window.
In System Configuration window, click Servicestab.
At the bottom, check the box “Hide All Microsoft Services“. This will hide all the services related to Microsoft so that you don’t disable essential services.
Under services section search and find Google Update (gupdate) and Google Update (gupdatem).
Google Chrome enable Update server in System Configuaration
Uncheck both the Google Services and click Applybutton. Click OK to save the settings.
Now, you will be asked whether you want to exit without restart or want to restart your PC now. Choose anything according to your current situation
System Configuaration Exit without restart
That’s it! You have successfully disabled automatic updates in Google Chrome.
Update: 2016-11-25
There is one more step to follow before you can completely disable automatic google Chrome updates. You have to delete or rename GoogleUpdate.exe file in the Chrome directory.
To do this navigate to this path:
32-bit (x84) Windows Users:

C:\Program Files\Google\Update\

64-bit (x64) Windows Users:

C:\Program Files (x86)\Google\Update\
Once you are in the Google update folder, look for Googleupdate.exe file. Right-click on it and select Rename. Renaming the file is better than deleting it.
Rename Googleupdate.exe to Googleupdate.info.
rename-google-update
To check whether the settings have been applied correctly, open Google Chrome > click Chrome Menu > Help > About Google Chrome.
Now Google Chrome will start checking for the available update. If you see an “An error occurred while checking for updates: Update check failed to start (error code 3: 0x800704C7 — system level).” message then you have successfully disabled the automatic updates in Google Chrome.
Turn Off Automatic Updates in Google Chrome
Note: When you open Google Chrome next time, you might be asked to provide administrative access to enable automatic update in Google Chrome. Simply select No every time.

Enable Automatic Update in Google Chrome

Once you have disabled automatic updates in Google Chrome, you won’t be able to update the Google Chrome unless you enable the Google update services in the System Configuration services tab. In case you want to revert the changes, here is how to do it.
Note: This will also work if you are facing the Can’t connect to the Proxy Server Error in Chrome.
Close Google Chrome browser.
Press Windows Key + R, type msconfig and hit enter.
From the System Configuration window, click the Services tab.
Check “Hide All Microsoft Services” at the bottom.
Now find Google Update (gupdate) and Google Update (gupdatem) and check the services.
Click on Apply and then on OK button to save the changes.
Next, navigate to:
32-bit (x84) Windows Users:

C:\Program Files\Google\Update\

64-bit (x64) Windows Users:

C:\Program Files (x86)\Google\Update\
And rename the Googleupdate.info to googleupdate.exe.
Restart your PC and open Google Chrome. Go to Chrome Menu > Help > About Google Chrome and Chrome will start checking for the updates.

How to Fake Your Location in Microsoft Edge and Chrome

Some websites have region restrictions because of which the visitors from India may not be able to view the contents posted on an American website. This mostly happens with video contents. No, I am not talking about Netflix here. But, if you can fake your location in Microsoft Edge and Chrome, you can access these region restricted contents without any problem.
What happens is that whenever you visit a website, it requests to access your location. Of course, you can turn down the request but still with the help of HTML5 Geolocation API, websites can know your location. They don’t need to know your exact location, but just the region. If the website has region restricted contents, then you will not be abe to access the content and may see an error ” the content is not available in your country”. This is more common in Sports websites.
You can bypass this by faking the location in your web browser. Google Chrome and Microsoft Edge allows you to fake location easily. In this post, I will show you how to fake location in Microsoft Edge and Google Chrome.

Fake Location/Country in Microsft Edge

You can fake your location in Microsoft Edge browser using the developer tools feature. In the developer tool window, you have the option to set and emulate longitude and the latitude of any country, thus successfully faking your location.
Open Microsoft Edge and open the web page for which you want to fake the location.
While keeping the page open, press F12 to openDeveloper Tools. Alternatively, click three dots at the top right and select Developer Tools.
Click the Emulation tab, and here you should see GeoLocation section.
Set “Simulate GPS” to On. Next, you have to enter the longitude and latitude of the location that you want to fake as.
To know the longitude and latitude of any location, you can use websites like latlong. Once you have entered the coordinates, simply refresh the web page, and you should have faked the location successfully.

Fake Location in Google Chrome

If you are a Google Chrome user then here is how you can fake the location on your web browser.
To fake location in Google Chrome, we will be using the Developer Tools option. Here is how to do it.
Open the web page for which you want to fake the location in Chrome.
While the page is open, press Ctrl + Shift + I to open “Developer Tools” in Chrome. Alternatively, click three dots at the top and select Developer Toolsunder More Tools option.
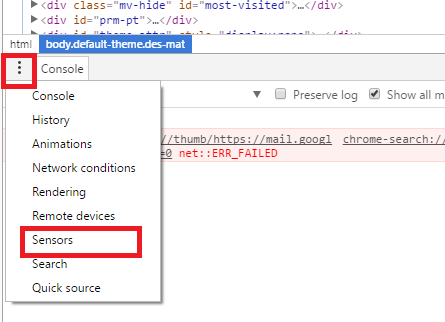
Now press Esc key to bring up the Console window. From the Console window, click three dots (top left) and select “Sensors“.
Now you can fake the location in Chrome. Click GeoLocation drop-down menu and select “Custom location” option.
Next, you have to enter the longitude and the latitude of the location that you want to fake. Use the link given above to find the long and lat of your location.
Once you have the location, enter them and refresh the page to see it in action.
That’s it. Now whenever you want to fake your location, you can do this from Developer Tools in Google Chrome and Microsoft Edge.

Use VPN to Bypass Region Restrictions

If you don’t want to do all these just to fake the location and access the restricted content then you can use VPN. Many VPNs including Hotspot Shield works great on Windows as well as Mac OS.
However, do note that the free version of the Hotspot Shield VPN does not allow you to set your own preferred country/location other than USA. For that, you may need to buy the premium version of the VPN.

Best Free VPN Apps – Windows – Android – iPhone – Mac – Linux

VPN (Virtual Private Network) allows you to maintain privacy online irrespective of the place you are in. It also does not matter what device you are using as most of the VPN clients supports Windows, Windows Phone, iOS, Mac OS X, Android and more. In today’s post, I have listed the best free VPN for Android, iOS and Windows PC and phones.
There are two types of VPN services. Free and Paid. Free VPN clients are good enough for browsing the web and keeping your privacy private. However, the paid VPN clients offer more speed and control over location, etc.

Advantages of a VPN? 

There are several reasons why you might want to use a VPN. However, the most important feature a VPN offers is hiding your location and your identity.
Some people use VPN to access region-restricted content. Suppose you are in India and want to access a website from the US that offers media content then you can do so with the help of a VPN by faking your location.
Another reason to use VPN is to access the website blocked by your Govt or ISP. Some countries have blocked access to social media sites such as Facebook and Twitter. You can unblock social media sites using VPN.
Another good reason to use VPN is to become untraceable by the internet surveillance agencies for your online activities.
So, here is my pick of the best free VPN apps you can use to keep your identity safe while surfing the web anonymously.

1. TunnelBear

Supported Devices: 
  • iPhone & iPad
  • Android
  • Mac
  • Windows
The only reason why TunnelBear can be called as a best free VPN client because of its easy to use UI. TunnelBear supports 1000s of servers with server locations in 20 different countries.
It also supports up to 5 devices at a time. TunnelBear comes with both free and paid subscriptions. The free TunnelBear account offers 500MB of traffic each month. So, that is a downside.
However, if you only need to use a VPN occasionally, then the free plan should work great for you. In case you need a larger plan, you can always opt for the premium TunneBear Plan that starts as low as $4.99 /month.
The performance of TunnelBear is great irrespective of the plan you are using. TunnelBear is the best free VPN for Windows and other devices.

2. Hotspot Shield Free VPN

Device Supported:
  • Windows PC
  • Windows Phone
  • iPhone
  • Mac
  • Android
Hotspot Shield is another VPN service provider that offers both free as well as premium subscription plans. Compared to TunnelBear, the Hotspot Shield provides a whopping 750 MB/ day traffic quota to its free users.
However, in the free Hotspot Shield VPN plan, you cannot select the location manually. This feature is only available with Elite Hotspot Shield subscription that offers unlimited traffic with a monthly/yearly / Lifetime plan.
The only downside of Hotspot shield could be is its performance. Your internet performance may take a hit when the Hotspot shield is active. You may also run into problems like something went wrong error.
However, I have noticed that at times it can increase the download speed in a situation where the server may have capped the download speed based on the location of the user.

3. Winderscribe Free VPN

Supported Devices:
  • VPN for Mac
  • VPN for Windows
  • VPN for Chrome
  • VPN for FireFox
  • VPN for Opera Browser
  • VPN for iPhone
The list of best free VPN software cannot be complete without mentioning the Windscribe free VPN service.
When compared to the TunnelBear, the Windscribe free VPN plan offers a generous 10GB of monthly traffic quota which is still less than what Hotspot Shield offers.
However, in comparison, the Windscribe may not give you the performance issues like other VPN clients.
Another strange thing about Windscribe VPN is that it is not available for Android smartphones. If you are an Android or Linux user, you should get the pro version of Windscribe VPN to install it on Android devices.
Ultimately, the Windscribe VPN also supports the free and open VPN clients such as OpenVPN, IKEv2, SOCKS5 and more. You can also get Windscribe VPN for a few selected WiFi Routers.
The Windscribe Pro VPN account starts as low as $9 / month and comes with features such as 45+ locations to choose from, unlimited connections and unlimited data.

4. Freelan VPN

Supported Devices:
  • Windows PC
  • Linux
  • Mac OSX
Feeling like a geek in the movies who operates everything using the command prompt? Well, then Freelan VPN is the perfect VPN client for you.
The Freelan VPN client is not for everyone but advanced users who are curious about open source software that requires manual setup to make it work.
When you install the Freelan, the program also installs new network drivers and takes controls of your web traffic. Nothing suspicious here though!
Freelan does not come with a GUI (graphical user interface). As a result, you have to control everything using the command prompt.
Do note that Freelan is not just a tool to surf the web anonymously. You can do more than just anonymous web browsing using the Freelan. If you are just looking for an easy to use free VPN client, Freelan is not your cup of tea.

5. Speedify Free VPN

Supported Devices:
  • Windows PC
  • Mac OSX
  • Android
  • iOS
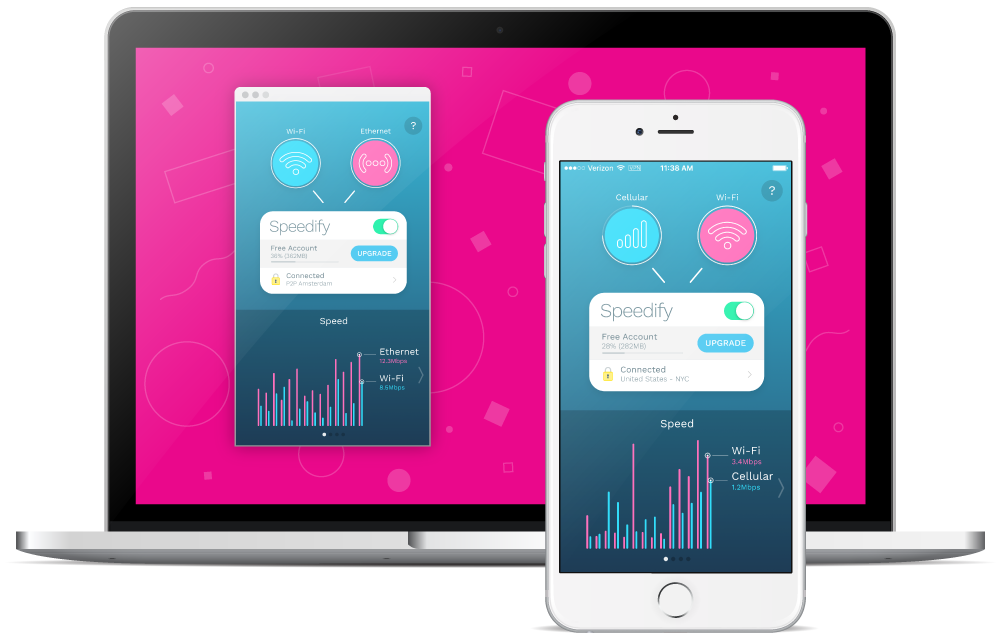
Speedify is yet another VPN client that offers great performance with reliability. Speedify also comes with two subscription option free and premium. You can choose from monthly to early premium subscription plans.
If you don’t want to pay for the service, the free Speedify VPN plan offers same reliability and performance but with 1GB of monthly data allowance with limited location selection option.
After the installation, the user doesn’t need to login to use the VPN. It also supports mobile devices such as Android and iOS.

Change Language from Hindi to English in Google Chrome

Google Chrome, being one of the most popular browsers for the Windows PC, offers the user an option to use the browser in their preferred language. For example, an Arab would prefer Arabic as the default language for the Chrome and a Chinese would prefer Chinese as the default language for the Chrome browser.
Change Google Chrome Language from Hindi to English
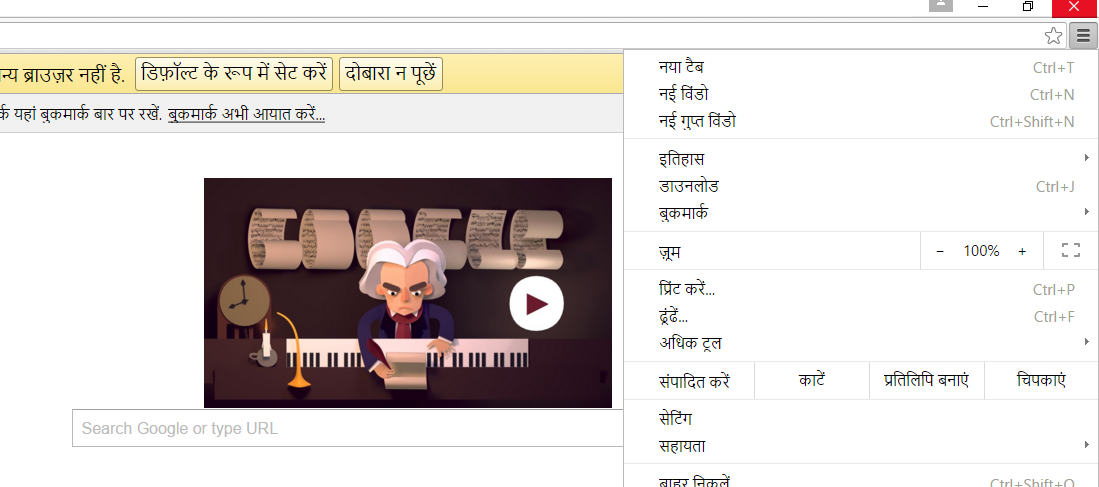
Now, this is not same with India. There is a misconception that Hindi is the national language of the country, whereas it is not. Despite, this when you try to download Chrome for the first time using a browser like Microsoft Edge, your default language will be set to Hindi instead of English. Now when you try to download Google Chrome, you will be redirected to the Hindi page of the Google Chrome.
Once you download and complete the installation of Google Chrome, you will not be surprised to see everything in “HINDI.” Even if you think that you can change the language from the Settings, it would not be possible unless you can read Hindi as everything under settings will be in Hindi. This shouldn’t be a problem for anyone with the knowledge of Hindi, but for the people who doesn’t know, Hindi may find it difficult to change the language from the Settings.
This is something I didn’t find very convenient. I even had difficulty locating the language settings in Google Chrome, as everything was in Hindi.
The Official Google Chrome forum does have instructions on how to change language settings in Google Chrome. However, the instructions require you to find Settings > Advanced Settings > Language which all are in Hindi and later change the language to English. If don’t know Hindi, you will have difficulty finding the Language section.
Fortunately, by using a direct address to Google Chrome settings, I was able to locate the Language settings section and change the preferred language to English. So, if you are facing the same problem and want to change Language from Hindi to English in Google Chrome, then here is how I did it.

Change Language from Hindi to English in Google Chrome

There are two ways to change language settings in Google Chrome. We will go through both the methods, but if you don’t know Hindi, the first method will work best for you.

Method 1: Access Google Chrome Language Settings Directly

Open Google Chrome and type the following address in the address bar. Hit enter to open Language Settings it.
It will open a “Languages” dialogue box.
Under the “Languages” section, you can see an Add button at the bottom. Click on it. (refer the image).
Language Add button in Google Chrome
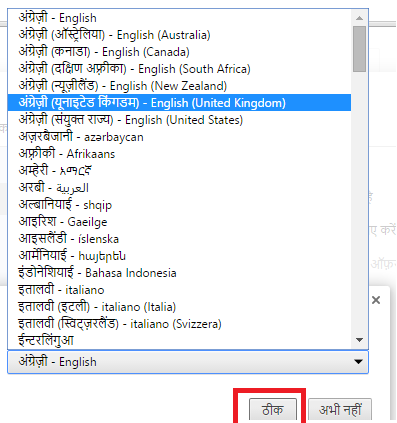
In the new “Add Language” dialogue box, click the drop-down menu and search for English. Select “English UK (United Kingdom), or any other English version and click the OK button.
Add Language English
Click the “Display Google Chrome in this language” button and then click the “Finished” button at the bottom of the Dialogue box to save the Settings.
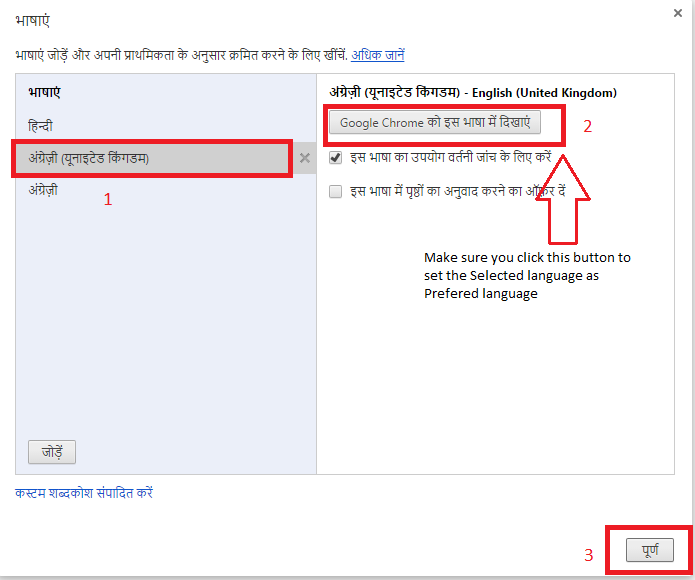
Finished Google Chrome Language English
Now close Google Chrome. Make sure you save any data or work before closing it.
Relaunch Google Chrome, and your default language in Google Chrome should be set to English. If you want to set the language to anything else, follow same steps.

Method 2: Change Language Settings in Google Chrome

You can also change the default language of Google Chrome from the Menu.
Click on the Menu button (three horizontal lines) and Select “Settings“.
Scroll down clicks on “Show Advanced Settings“.
In the “Languages” section, click the Language and input settings button.
In the “Languages” dialogue box, click on Add button and select your preferred language.
Click on “Finished” button to save the language.
Close Google Chrome and reopen it. Now your default language in Google Chrome should be set to your preferred language.