Microsoft Office Online is a Microsoft service that allows you to create and edit Office documents online without any extra charges. If you have upgraded to the Windows 10, then the Office 2013 or Office 365 will not come pre-installed, and you need to purchase the product separately. Alternatively, if you have access to the internet, you can use Microsoft’s Online Office Apps.
The Microsoft Office online app includes almost every application that you get with the Office 365 Offline version on your computer. The only difference here is that here you need an active internet connection to create and edit your documents online. The documents don’t need to be saved as they saving feature is automatic. However, you can rename the document using the Save it as a feature.
Now when you visit Office.live.com, you will see options to access Word, Excel, PowerPoint, OneNote, Sway and more. If you click on Word and create a new Word Document, you will be able to do it. However, in case you want to upload an already created document from your PC for editing, then there is no upload option in MS Office Online.
Though Microsoft did not provide upload feature in MS Office Online, you can still upload MS Office documents and edit them in MS Office Online.
The upload and edit feature might come in handy if you want to edit a document that was sent to you by someone else through email and also if you don’t have MS Office installed on your PC. In such cases, you can download the email attachment to your PC and then upload and edit it in MS Office online.
Upload & Edit Word Document in MS Office Online
As I said earlier, there is no inbuilt option in MS Office Online that allows you to upload documents from your PC. However, there is a simple way through which you can upload MS Office documents to Office Online and edit.
Whenever you create a new document in MS Office online, all your documents will be saved in your OneDrive account. Next time when you want to access these saved documents, they will be retrieved from OneDrive account. So, if you can upload a document to your OneDrive account, you can open it using MS Office Online and edit it. Here is a step by step guide on how to upload and edit documents in MS Office online.
Step 1: Create Microsoft Live/ Outlook Account
To access MS Office Online you should have a Microsoft Live or Outlook account. So, create an Outlook account at outlook.com. If you already have an Outlook account, then login to your OneDrive account.
Go to Onedrive.live.com and sign in using your Outlook/Hotmail account.
Step 2: Upload Document to Office Online
Once you are logged in to Onedrive account, it’s time to upload Word, Excel, PowerPoint document to OneDrive account.
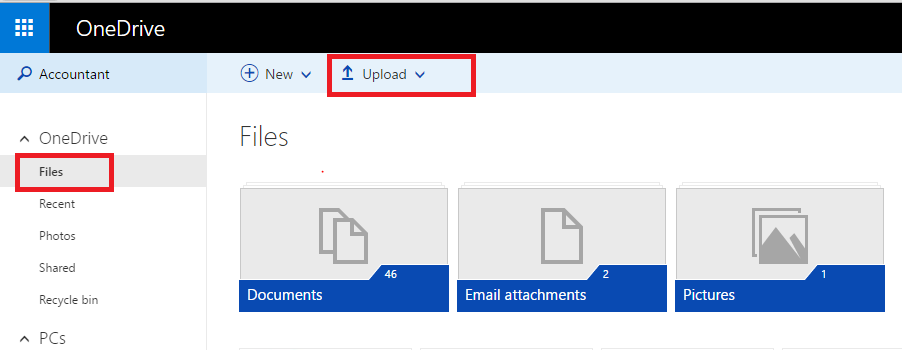
From your OneDrive account’s main screen click on Files tab (if you are already not in it).
To upload a new document, click on Upload (Up Arrow) icon and select Files if you want to upload one or more than one file. If you want to upload a complete folder, then select Folders.
Select the document file from your PC’s hard drive and upload it to OneDrive account.
Once successfully uploaded, you have to locate the files before you can edit it in MS Office Online.
You can use the given search function to find the uploaded file. Type the name of the file in the search bar (top left side) and hit enter.

If you found the file, click on it. The file will open in a new window, and you can view the contents of the document.
Step 3: Edit the Document
To edit the document, click on Edit Document (top right side) of the screen and select Edit in Word if it is a word document. If it is a PowerPoint/Excel file, you will see related options instead.
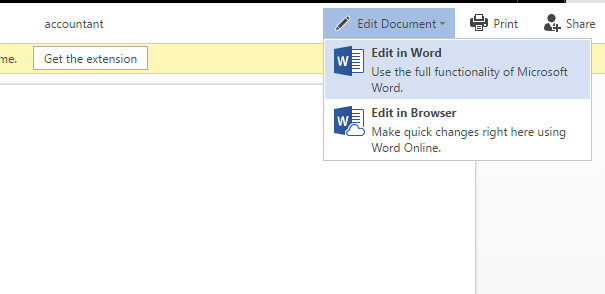
Next, a Pop-up dialogue box will appear asking you to select in which application you want to open the Word Document. Select “Edit in Word Online“.
Now the page will load, and the document will open in Word Online. Now you can edit the Word document and save it in OneDrive account.
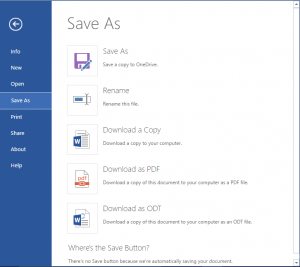
MS Office Online saves your document with its default name automatically. If you want to change the name of the Document then in the Edit in Word Online screen click on File and select Save as. Here you have the option to either rename the file or save it with a new name.
You don’t have to open each and every file by logging into your OneDrive account all the time. Although you have to select your saved documents from the OneDrive account, you can also do this from MS Office Online edit screen.
Go to Office.Live.com and select Word Online/Excel Online/PowerPoint Online etc.
Once you are in the edit screen, click on File >> Open and scroll down to the bottom and click on More on OneDrive link.
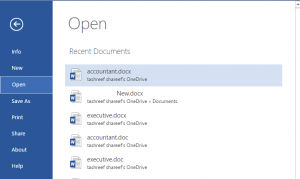
It will take you to your OneDrive account. From here select whatever the file you want to edit and open it in MS Office Online. From here you can also access your recently edited documents.