Fix Screen Overlay Detected Error in Android

If you use a Samsung Galaxy smartphone such as the latest Galaxy S7 or S7 edge, then you might have come across the annoying screen overlay detected error in Android while trying to install an app. The problem is not specific to the Samsung devices, but known lesser in other OEM made smartphones. Now if you want to fix this error, here is how to fix screen overlay detected error in Android.

Causes of screen overlay detected error in Android

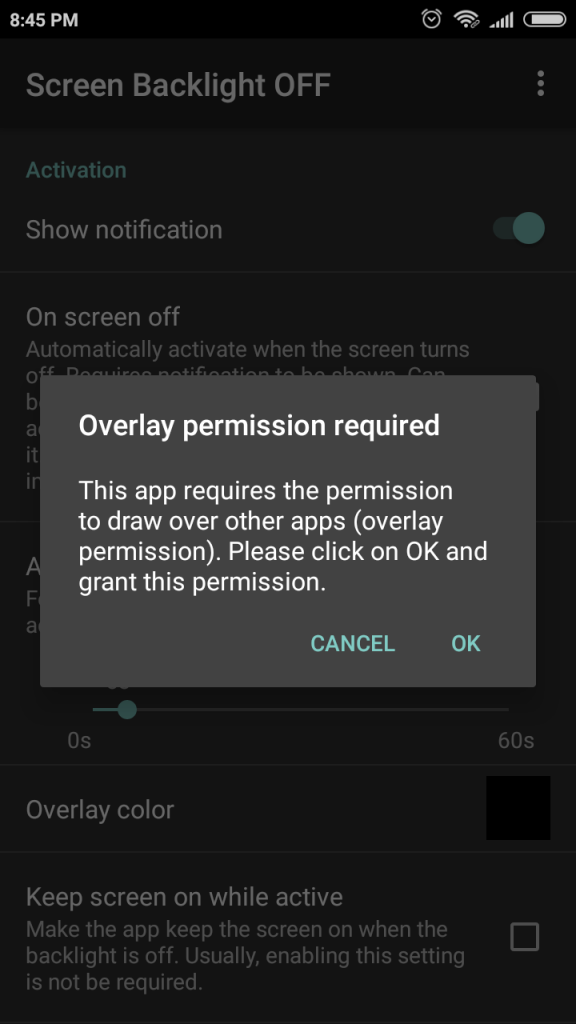
The error screen overlay detected error in Android occurs when you try to install a new app or even launch the already installed app that requires permission to initialise. When you proceed to install the app providing permission, you will be stuck with screen overlay detected error on your device.
The problem can occur due to several reasons. One of them is having floating apps enabled on your device. If you have used Facebook messenger, you would know that how it uses the screen overlay feature to keep the chats head above whatever you are doing on the phone.
However, Android does not allow permission to be changed if the overlay is in use or being used by some other app such as Twilight or Facebook messenger.
Other reason could be a third-party app interfering during the installation process of the new app resulting in screen overlay detected error.
The error message clearly hints at the screen overlay causing the problem. The error message “to change this permission setting, you first need to turn off the screen overlay from the Settings > Apps”  hints at the solution to this problem as well.
The solution recommended by the device is to turn off screen overlay and then launch the app that you were trying to launch.
But the reason could be something else as well. It could be a third-party app causing the problem as mentioned earlier.
Irrespective of the reason here are a few fixes that can help you solve screen overlay detected error message.

Fix 1: Turn off Draw Over Other Apps

To turn off Draw over other apps for a specific app or all apps, you need to open the Draw over other Apps menu. There are two ways to open it.
1 – When the screen overlay detected error message appears, tap the Open Settings option at the bottom of the error message. This will take you to the draw over other apps menu.
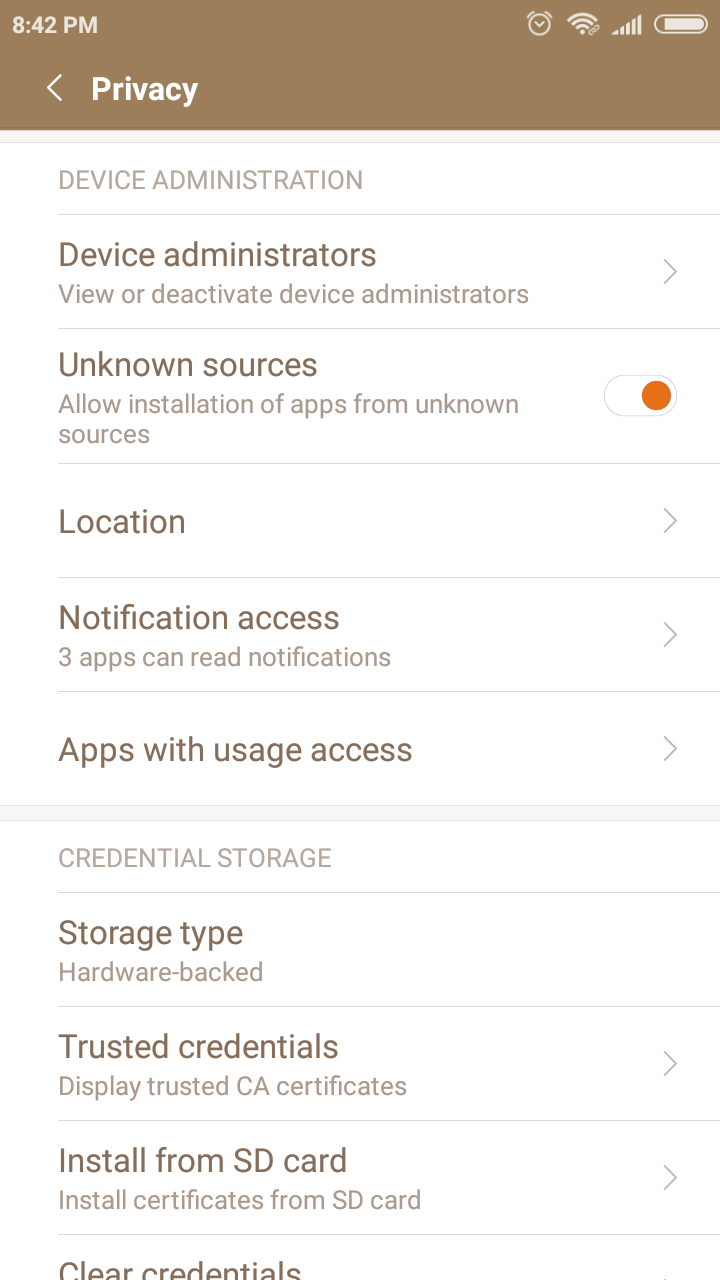
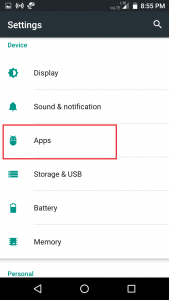
2 – If not, go to Apps open Settings.
Scroll down to the Devices section and tap on Apps.
Under Apps, tap the little Gear icon (top right side) to open Apps settings. Next, tap and open Draw over other apps.
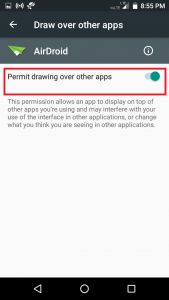
Now you have to tap and open the app that you think is causing the screen overlay detected error message on your phone. So, tap on the app to turn “ Permit drawing over other apps” option to OFF!
Things can be a bit different if you are not using the stock Android version on your phone. Here is how to find these settings in Samsung and LG phones.
Samsung Users – Go to Settings > Application Manager > Tap MORE (top right corner) > select “Apps that can appear on Top” option.
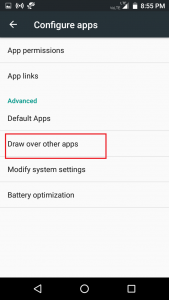
LG Users – Go to Settings > Apps > Tap three dots (top right corner) > Select “Configure apps” > select “Draw over other apps” option.
If you are not sure, what apps is causing the problem then start with turning off “Draw over other apps” feature for one app and do this with all the apps until the problem is solved.
This way you will be able to find out which app is causing the problem. Once you have turned off all the apps in the “draw over other apps” section, you can launch the app that you were trying to launch in the beginning but getting the error.
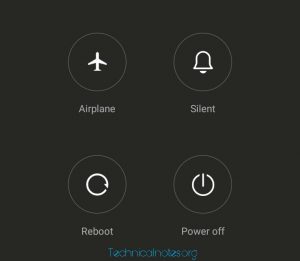
Even after turning off all the apps in the “draw over other apps” feature the problem is not resolved, then restart your device and see if that works. At times, a lack of restart might have prevented the changes from taking place on your phone.

Fix 2: Uninstall Third-Party Apps

In most of the cases, the first fix should work and you should be able to get rid of the screen overlay detected error message in Android. However, in case it did not work even after restarting your phone, then this could be a problem with one of the apps installed on your phone.
At times, a third-party app can cause the screen overlay detected error message on your phone. The app can be anything from the newly installed one to the oldest champ residing on your phone.
In most of the cases, it could be the recently installed app that is causing this error on your phone.
So, how to solve this issue? There is no “Go-to” solution to this problem. In this situation, you cannot even boot into safe Mode to check if the third-party app is causing the error because you cannot run third-party apps in the safe Mode.
What you can do here is take the help of the list that I have given below. The list includes the apps that are commonly known to cause the screen overlay detected problem in Android devices.
If you have any of these apps installed, uninstall or Disable them. Try to run the app that was showing the error. If the app works fine, try to reinstall the uninstalled app and you should have your problem resolved. However, if the problem re-occurs after reinstalling the app, then you may have to bid
However, if the problem re-occurs after reinstalling the app, then you may have to bid goodbye to one of the apps as you cannot have both (at least for now).
Apps that can cause this error are as follows:
Note: The list has been created after noting several users facing the screen overlay detected problem on their device due to these apps.
  • Twilight
  • Facebook Messenger
  • Uber App
  • DU Booster
  • Tuner App (Any Tuner or booster, cleaning app)
  • Clean Master
  • Weather Channel
  • Screen Recording App (any)
  • DU Battery Saver
  • File Commander
  • Microsoft OneNote (Disable Start Badge feature in it)
  • Clean Sweep
  • Drupe (Dialer App)
  • AppPoint Launcher
  • Anti-Virus App (any)
There can be several other apps that can cause the error screen overlay detected in Android. If you have installed any new app recently then try uninstalling it. Make sure you clear your cache as well. Also read, how to run Android apps on PC.

Fix 3: Turn Off Assistive Touch in Samsung Galaxy Phone

If you are using a Samsung Galaxy smartphone and facing the screen overlay detected error then try to turn off the assistive touch and then uninstall it. It has worked for a few Samsung Galaxy users, might also work for you.
Go to Settings > Search > Assistive Touch > Off.
Go to Settings > Applications > Application Manager > Assistive Touch and uninstall it.

How to Play YouTube Videos in the Background in Android

The YouTube app for Android has a ton of features including double tap right to go forward and double tap left to go backwards. However, there is still one feature missing in the YouTube App for Android. That is being able to play YouTube Video in the background.
So, today in this article, I will show you how to play YouTube videos in the background in Android. So let’s get started.
Even though the official YouTube app doesn’t support play video in the background feature, there are third party Android apps that make it possible. One of the very first app to make this possible was Ulisten, which unfortunately was removed from the Play Store.
Then there are apps such as Screen Backlight Off that allows you to turn off your screen while playing the YouTube video.
Awesome Pop-up Video is another app that lets you watch and play YouTube videos in the background or at least it doesn’t pause the video when you leave the app.

Play YouTube Videos in the Background with Awesome Pop-up Video

Awesome Pop-up Video is one of the best apps that allows you to play YouTube videos in the background. The app offers floating video feature that allows you to open any other app on your phone while playing the video on a floating screen.
  • First, download and install the Awesome Pop-up Video app from the Google Play Store. Get it here.
  • After the installation, open the app and it will ask you to grant some permission. Do it.
  • Now open the Awesome Pop-up Video app and search for any YouTube video that you want to watch.
  • Once the video starts playing, you can go back to the home screen. Or open any other app.
Now instead of pausing the YouTube video, the app will float the video on your screen. You can chat using WhatsApp or Facebook app while listening to the YouTube video in the background.
The Awesome Pop-up video app also supports Screen off playback feature that allows you to keep playing the audio even when the screen is off. Unfortunately, that feature does not work with YouTube.
The Awesome Pop-up video also supports Vimeo video playback. You can also play a video from the URL by entering it into the search field of the app.
As you might have noticed by now, Awesome Video Pop-up is not an extension but an app in itself. You cannot use it alongside YouTube app. You have to use Awesome Video Pop-up app if you want the floating video feature and play YouTube videos in the background.

Play YouTube Videos using Screen Backlight Off

Now if you want to play YouTube videos when your screen is off, you can use the third-party app called Screen Backlight Off. The app is not available on the Play Store, as it may violate Google Play Store policy.
The Screen Backlight Off app comes in handy if you use YouTube app to stream music. If you are not watching a video, then it is better to turn off the screen. Since the default YouTube app does not support this feature, we can use Screen Backlight off app.
Note: The Screen Backlight Off requires Root access to work up to its full potential. It also works on non-rooted devices. However, instead of turning off the screen, it will add a black layer on the top of your YouTube screen to make it look like the display is turned off.
Since the app is not available on the Play Store, you need to install the Screen Backlight Off app .apk. To do that, first, you need to enable installation from unknown sources.
  • To do this, go to Settings and tap on Security.
  • Now enable “Unknown Sources” option.
  • If you don’t find Unknown sources option in the Security section, then look in the Privacy option.
Now you have to install the Screen Backlight Off app using the .apk file. You can get it from the XDA forum here. After downloading the file, install it.
After installing the app, open it. It will ask you to grant root access, tap on Grant and proceed.
Next, it may also ask you to give Overlay permission. Tap OK and proceed.
Now if you swipe down from the notification panel, you can see the Screen Backlight Off toggle.
Next, open the YouTube app on your phone and play any video or audio that you wish to listen.
To turn off the screen, swipe down from the notification panel and tap on Screen Backlight Offtoggle.
In a moment or two, your phone screen will be turned off.
Apart from the YouTube app, you can also use Screen Backlight Off app on your native video player to turn off the screen while watching a video.
The Backlight Screen Off app also offers other customization option including:
  • Activation Delay
  • Deactivation options
  • Floating buttons
  • On screen off and more

Fix “Server Error, Retry” Google Play Store Error

The error “server error, retry” can occur on any Android phone and it can be frustrating if you are unable to install your favourite app due to this error on your Android phone while using Google Play Store.
Suppose you want to download an app and you open the Play Store. Instead of seeing the regular Play Store home page, you are greeted with “server error” “retry” button on the screen.
As I said earlier this error can be annoying, but you can fix it most of the time. You just need to follow the instructions given in this article and you can fix the Server error, retry problem in the Google Play Store.
Do note that these fixes can also fix “error while retrieving information from server RH-01” another Google Play Store error that creates a similar set of problems.

Fix Server Error, Retry by Restarting your Phone

You would be surprised to see that at times even a simple restart can make this error go away. There are several users who had this error and they were able to fix this error by simply restarting their phone.
So press and hold the Power key.
When the options appear, select “Reboot / Restart
Once the device is up and running, open Google Play Store and see if the server error is resolved.

Turn Off / On Airplane Mode / Flight Mode

Now, this may not sound like a very convincing solution, but it has worked for a few users who had Google Play store server error issue.
On your home screen pull down the notification bar.
Tap on Airplane / Aeroplane / Flight Mode to turn it On.
Tap on Airplane mode again to Turn it Off.
Now restart your phone and see if it has solved the Google Play Store server error problem.

Force Stop, Clear Google Play Store and Play Service Cache

You can fix the server error in Play Store by clearing the Play Store, Play service, Google Service Framework cache etc.

Force Stop and Clear Google Play Services Cache

Go to Settings and go to Application Manager orApps.
If you are using Xiaomi Phone, then tap Installed Apps.
In the All tab, scroll down and find Google Play Services.
Tap and open Google Play Services.
Tap on Clear Cache.
Tap on Force Stop.
Press back button to go back to the All apps list.

Force Stop and Clear Google Service Framework Cache

From All Apps, find and open Google Services Framework.
Tap Clear data.
Tap Force Stop and tap OK.
Press back button and go back to the All apps list.

Force Stop and Clear Google Play Store Cache

From the All Apps, tap on Google Play Store.
Tap Clear data.
Tap Force Stop and tap OK.
Now restart your Android phone. Afer the restart, open the Google Play Store app and see if the server error is resolved.

Try Mobile Data or Change WiFi

At times the Google Play Store server error can occur if there is a problem with your WiFi connectivity.
If that is the case here are a few things you can try.
Try Mobile Data – If you have a mobile data connection then try to use it instead of your WiFi and see if it solves the error.
Change WiFi – Try to connect to any other WiFi network you have access instead of your home WiFi or the one which you are using right now.
Check your WiFi Router – If you are able to use the Google Play Store without any error on other WiFi connection, the problem can be with your WiFi router.
Simply try to restart your WiFi router or reset it if necessary. Once done, set it up again and see it fixes the error on your Android phone.

Change Language

One of the users on a forum noted that when he changes his language to the English United States from his current language setting, the Google Play Store works without any issues.
To change language settings, go to Settings.
Find System and Device and tap Additional Settings.
Tap Language and Input.
Tap Language and select English (United States)from the list.
Restart your phone. After the Restart, open Google Play Store and see if the error is solved.

Remove and Add Google Account

You can also try to fix this error by removing the Google Account from your device. Here is how to do it.
Go to Settings.
Go to Accounts section and tap Other Accounts.
Tap Google and select your Google Account that you want to remove.
Now tap on three dots (at the bottom / or top right of the display) and select  Remove Account.
Note: Remove Google Account and Delete Google Accounts are different. Make sure you find Remove Google account option.
Note: The process to remove and add Google account can be different based on your device and Android OS version.
Now you have to re-add the Google Account to your device.
Go to Settings >  Accounts > Other Accounts.
Tap, Add button at the bottom.
Now enter your Google account details and save. Afer that, open Google Play Store and see if the Server error, retry problem is solved.

Uninstall Google Play Store and Play Services Updates

Uninstalling and reinstalling Google Play Store and Google Play Services updates can also help you fix Google Play Store server error.
Go to Settings.
Tap Application Manager / Installed Apps.
In All apps tab, find Google Play Services and tap to open it.
Tap Uninstall Updates (at the bottom) and tap OK.
Now go back to All apps tab and find Google Play Store.
Open it, tap Uninstall updates and tap OK.
Now restart your phone. After the restart, tap on Google Play Store app, and it should prompt you to install Google Play Updates.
Download and install the updates by following the onscreen instructions.
After the updates are installed, open Google Play Store and check if the error is fixed.

Install Google Play Store Apk

If you are still facing the Server error while trying to open the Google Play Store, you can try to install the Google Play Store apk.
First, you have to enable installation from Unknown sources. For a security reason, Android phones cannot install apps from Unknown Sources. However, users also have the option to install apk file from unknown sources if they want to.
Go to Settings.
Tap Privacy.
Enable “Unknown Sources“.
Now download Google Play store apk from any trusted source. After downloading the apk, tap on it and install it.
Make sure that you disable “Unknown sources”option after installing the Google Play Store apk.
Now open Google Play Store and you should be able to download and install apps from Google Play Store without any server error.

6 Google Maps Tips You Didn’t Know

Google Maps is undoubtedly one of the best online maps available for the Android users. Though the offline feature of Google Maps isn’t very convincing with its “update on time or be lost rule”, still Google Maps is the best online navigation you can get on an Android device.
However, just because you use Google Maps daily, do you think you know everything about Google Maps? We bet you don’t. Well, I could be wrong, but still, take it as a test and see if you know all the Google Maps tips and tricks I mentioned in this article. If you do, well, congrats! you are pro googler.

6 Google Maps Tips and Tricks You Should Know

1. Share Your Location

You can share your location directly from the Google Maps with anyone in your contacts list. This is a very handy feature in case you want to send your exact location to someone. Your friend or family member can track your route for a specific amount of time.
To share your location, do the following.
Open Google Maps.
Tap the Main Menu (three horizontal lines).
Select Location Sharing option.
Now set for how many hours you want to share your location with your contact.
Tap on Select People and then tap Turn On.
Here you can select any contact from your list with whom you want to share your location.
Your selected contacts will get a notification saying that they can track your location. However, if your selected contact does not have a Google account then a link will be sent to contact who can open the link to track your real-time location on any web browser.

2. Find Parking Lots with Google Maps

If you live in a city where Finding a parking lot is nothing less than winning a battle, then the Google Maps can come in handy. Google recently added an find parking lot feature to the Google Maps which allows you to find a parking lot in a nearby location with three taps.
Open Google Maps and select Car navigation.
Now type in your destination.
At the bottom, you may see a Limited notification with “P” icon which represents Parking area.
Tap on Limited notification and then tap  Find Parking.
Google Maps will now search for all the available parking areas and show you on the screen. Tapping on ADD PARKING option will add the parking area to your itinerary.

3. Plan Your Trip After Reaching the Destination

Some plans are unplanned. So, what would you do if you did not have time to plan your trip in advance? Well, take help of Google Maps.
Google has integrated a feature called things to do near me in Google Maps. What it does is when you type things to do near me, Google shows nearby restaurants and placed based on their reviews.  This can come in handy if you are not sure of where to visit when in no man’s land.
Open Google Maps and type Things to do near mein the search bar.
Google will find your location and then suggest places to visit based on your location and reviews by other users. You can also get more accurate results by searching with location name. For example, type things to do in Bangalore and tada! you have most popular places to visit.

Offline Maps

Offline Maps in Google Maps is a new feature that many people may not be aware of. Suppose you are planning a trip to a place where the internet connectivity isn’t that great. In such situation, relying on online Google Maps isn’t a very clever idea.
What you can do here is that download offline map in advance on Google Maps and be sure that irrespective of the connectivity status, you will be on the right path and reach your destination on time.
Open Google Maps and tap Main Menu (three horizontal lines).
Tap Offline Maps and tap Select Your Own Map.
Next, you need to select the area of which you want to download the map.
Tap Download button to start downloading offline Map.
The downloaded map will be available for one 1 month from the date of downloading. You need to keep updating it after every few week else the map will expire and you won’t be able to use it.

5. Label Your Work and Home

If you commute daily to work then you can add your work and home destination in Google Maps. By doing so, Google Maps will always show them as destination option whenever you are ready to travel.
Open Google Maps and tap the Main Menu.
Tap Settings and select Edit home and work.
Now add your home address in Home and Work address in Work fields.
The next time you open Google Maps and tap Get Directions, you will have Home and Work addressas a destination in the list.
You can also label other places that you visit often like Gym, School / College, your favourite cafeteria etc.

6. Google Maps History

There are plenty of times I have searched for a place on Google Maps while at home and then forget the name of the place while travelling. This is the time I wish I would have noted the names.
Thankfully Google Maps has a Maps History feature that records all your recently searched location history. So, whenever you want to remember any of the recently searched places you can find it in Google Maps history section.
Open Google Maps, and go to Main Menu > Settings.
Tap Map History to open it.
Google Maps should list all the locations that you had searched on Google Maps.
Tap on any of the search results to get the direction. Tap the X icon to delete that location from your search history.

iCloud Guide – Answer to you all ‘What’ and ‘how’ Queries!

Cryptocurrencies and Mining – How it works?

Fix Runtime Error 429 ActiveX Component can’t Create Object

As we all know Windows is the most popular operating system which is primarily used on PC. But we all face many types of errors while using the system or during the installation process. Here we came up with one of the frequent error which is “Fix Runtime Error 429 ActiveX Component Can’t Create Object”. This error appears in almost every Windows OS version such as XP, 7, 8 and 10. You firstly need to look up for the reason why this error occurs. Then accordingly need to fix it.
This error occurs on Visual Basic when you use a New operator or CreateObject function. This error occurs when component object model won’t be able to create the request to an Automation object. And thus the Automation object won’t be available for Visual Basic.
Fix Runtime Error 429 ActiveX Component can’t Create Object

Causes for Fix Runtime Error 429 ActiveX Component Can’t Create Object:

  • Corrupt Windows registry in Windows OS. Data Access Objects (DAO) might not be properly be registered.
  • Windows Operating System software – Corrupt Download or incomplete installation.
  • Logged on the user might not be an administrator.
  • ActiveX Component the program is trying to initiate which is not initializing properly. Another possibility is that the program looking for DLL/OCX which is not available on the system.
  • DLL file required was available but was corrupted.
  • Virus or malware infection is another cause as it corrupts Windows OS related program and system files.
  • While using Microsoft Access there is a possibility of this type of errors.
  • Some viruses might delete the Windows system files.

Ways to Fix Runtime Error 429 ActiveX Component Can’t Create Object:

There are many ways to Fix the error but it might be a hectic one. As if you won’t be able to figure out the exact reason for the error. You have to try the alternate option. The ways to fix the error may take some time.

Fix 1: Examining the Code in Visual Basic

Firstly try to find the error in the source code of visual basic. Make sure that the code uses an explicit object creation. Both of the sample codes shown in the image uses implicit object creation. Thus, the Microsoft Office Word 2003 does not able to start until the variable is called at least once.
Fix Runtime Error 429
Instead of that, you can explicitly call to create each object separately. When you do explicit calls to create each object. The problem also becomes easier. Readability of the code becomes easy.
Fix Runtime Error 429

Fix 2: Run the Application as Administrator

Right, Click on Application go to properties and set the application as Run as Administrator.

Fix 3: Unregister and Re-register the DAO360.dll

First, check your DAO version of the file then follow the procedure to Unregister and Register.
  • Open Command prompt as System Administrator.
  • Type the command Regsvr32 /u “C:\Program Files\Common Files\Microsoft Shared\DAO\DAO360.DLL”.
  • Click enter to unregister the DLL.
  • Then type the command Regsvr32  “C:\Program Files\Common Files\Microsoft Shared\DAO\DAO360.DLL”.
  • Click enter to again register it.

Fix 4: Download and Install the package msxml4.msi.

To download the package from Microsoft official website . After downloading the package install it on the system.

Fix 5: Reinstall MS Office software.

Uninstall the existing version of the software and try reinstalling it from the original disk. This is a recommendation from the Microsoft. Make sure that it is run as administrator.

Fix 6: Check for Driver Updates

Sometimes due to outdated drivers, error 429 occur. It might be working fine someday suddenly it stops working. It is very difficult to find the drivers to update manually some particular driver to solve the issue of error 429. Auto-update of drivers work fine in this cases.

Fix 7: Malware Scan for PC

There is a chance that Fix Runtime Error 429 might be related to a malware on your PC. These malicious viruses can damage, corrupt, or even delete Runtime Errors-related files on your system.

Fix 8: Examine the System

System configuration can also create some problems like out-of-process COM servers creation. To troubleshoot, this kind of problem you have to work hard. Follow the procedure.
You need to Examine the version numbers of OLE system files that are used for automation management. These files are installed in the groups. These files must have the same build numbers. There are some instances where file installed separately with other build numbers. To avoid the problems related to the automation, you have to examine the files make sure that the files builds are same.
Location: Windows\System32 directory or in the Winnt\System32 directory
To check the file version, right-click the file, and click on Properties. Verify that the last four digits of the file version are the build number. The date shows the modification date. Make sure that all the values must be same for all the automation files. If it is found that the files build numbers don’t match or the modified dates. Then you have to download a self-extracting utility that will update your automation files. 

Fix 9: Clean Your System Junk Files

Cleaning the system junk files are sometimes the reason for the Fix Runtime Error 429. It can cause Windows OS to respond very slowly or throws an error 429. Cleaning also enhances your system speed.

Fix 10: Clean installation of Windows

This is done when all the options won’t work as it is a time-consuming option. But it will start your system from scratch as remove all junk files, programs installation.
We recommend you to try option number 10 when all the option fails. There are more options as this is a very vast kind of error. You can search for an alternate method and fix the error. Do comment in the comment section if find any difficulty fixing the error or comment any alternate option which may be very useful in the future solving the error.

Best Proxy Sites for Safe and Anonymous Browsing

How to fix Touch ID not working issue?

With the advancement of technology, many of the gadgets in the smartphone industry have undergone a certain change which is also the reason that many of the marketers (sellers & buyers) are enjoying and upgrading themselves too.  Apple’s who is the leading tech company is known for its iPhones, iPad, Smartwatches, MacBook etc. Though some of the smartphone models produced by the company have experienced some issues, which is related to the Apple’s Touch ID. So, if your Touch ID is not working, then here are few tips to fix it.

What basically is Touch ID?

It is a feature found on the iPhone, iPad, and MacBook which lets the user open the device by just the touch. Apple’s Touch ID is also useful for transactions with iTunes Store or App Store. Not all Apple device possesses the Touch ID, but models including iPhone 5s and higher have it along with iPad Air 2, iPad Mini 3/4 and iPad Pro both supporting the versions iOS 11.1/11/10.
Touch ID features:-
  • Use the feature ‘Rest finger to open’.
  • Make use of ‘Raise to wake’ feature in which one can unlock their iPhone with the Touch ID without pressing the home button. An important fact to know is that ‘Raise to wake’ feature works only for a limited number of models including iPhone version 7/7 Plus, iPhone SE and iPhone 6s Plus/6s.
  • If nothing suits you, then simply enter the Passcode and access your iPhone.
To avail benefits of Rest Finger to Open” feature, one needs to follow following steps:-
  1. Go to the settings tab.
  2. Click on Accessibility.
  3. Select Home Button
  4. Finally, choose ‘Toggle Rest Finger to open’ to ON.
To avail benefits of “Raise to wake” feature, one needs to follow following steps:-
  1. Click on Settings tab
  2. Choose ‘Display and Brightness’
  3. Shift ‘Raise to wake’ to ON.

How does Touch ID work?

There is a ring around the sensor involved in Touch ID, which when detects a finger, triggers a function that captures a high-resolution image of the finger.
touch id not working
The data generated through finger capturing is transformed into a mathematical representation and sent via a secured enclave. If the representation matches, an affirmative response is being displayed letting the user access the device.
If the finger captured generating the mathematical representation denies the authorization, the user cannot enter the system. Moreover, this is a self-improving process as it recognizes the fingerprint once entered.

Troubleshooting the Touch ID issue

  1. Make sure that complete surface is properly scanned during the first stage of registration and all the edges of the finger are scanned during the second phase of the registration.
  1. Take special care that no moisture is there on the finger or the sensor. To ensure this doesn’t happen, wipe both the surfaces cleanly with a clean, static-free cloth.
  1. The correct position to scan the finger is that there should be proper contact with the metal ring as well the home button during the scanning process.
  1. Despite the lightning speed of the iOS, resist from lifting the finger too fast during the scan.
  1. Refrain from putting too much pressure on the home button and capacitive ring as it can cause problems in effective registration of the fingerprint.
  1. Instead of scanning just one finger, register at least 2 fingers of both the hands for backup.
  1. In case of any error mid-process, delete the fingerprint and restart the process (Virat PC) or it may trouble in the later stages.
  1. If the iPhone is protected with a screen guard or a protective case, pay special attention that it doesn’t block the home button or the capacitive ring, as it can trouble with the functioning of the Touch ID.
  1. Try force restarting the iPhone or iPad if trouble still exists using the home button along with Sleep/Wake button.
  1. Toggle on and off the Touch ID option to temporarily enable and disable the service.
  1. There can also be a possibility that due to the use of faulty chargers; the interface acts abnormal causing Touch ID to not function properly.
  1. In that case, check the charger being used to charge the iPhone/iPad and make sure that it is an original and genuine one from Apple that came with the iPhone/iPad.
  1. If not, avoid usage of the faulty charger as in the long run, it may cause severe damage to the device.
  1. If nothing works, try resetting the phone without any data loss with the help of a tool.

How to fix Touch ID issue with tools?

If none of the above works, there is a possibility of a software issue in the iPhone. To resolve this, a system recovery tool, iMyFone D-Back can be used. This tool has a ‘Fix iOS System’ option that can fix various problems of the iOS without any data loss.
touch id not working
Besides this, it also enables data recovery from iPhone/iPad and even restores the backup files present in iCloud or iTunes.
Fix iOS System has 3 modes, The modes are:
  1. Standard Mode
  2. Advanced Mode
  3. Exit Recovery Mode
Using the standard mode one can resolve the Touch ID issue effectively without any data loss.
Steps to resolve Touch ID issue using iMyFone D-Back
  • Run the tool.
  • Select the option ‘Fix iOS System’
  • Choose the Standard Mode
  • Download the suitable firmware
  • Click on ‘Start To Fix’

How to Fix Page Fault In Nonpaged Area: Best Fixes?