Fix Hotspot Shield Something Went Wrong Error

Hotspot Shield is one of the best VPN software you can install on your PC and Mac. While the Hotspot Shield itself works excellently on PC and Mac, at times, you may end up with Something Went Wrong Error while using it. Here is how to fix hotspot shield something went wrong error in Windows 10, 8.1,7 and Mac running MacOS Sierra, Yosemite, etc.
The Hotspot Shield something went wrong error suddenly started showing when I restarted my PC. When I tried to run Hotspot Shield, it was only showing “Something Went Wrong, we are trying to fix the problem. It might take few seconds”.
Even after waiting for a few minutes, the problem did not go away, and the Hotspot Shield did not start. It was stuck to the same error message stating “something went wrong.”
Fortunately, after tinkering for few minutes here and there, finally, I resolved the error and fixed hotspot shield something went wrong error.
If you are facing similar kind of error with hotspot shield here is what you can do to fix it.

Fix Hotspot Shield Something Went Wrong Error

hotspot-shield-something-went-wrong-error
Even though Hotspot Shield is available for Smartphones as well, all of the below-mentioned fixes won’t work on them. As some fixes require you to access hotspot shield files that are only visible on PC and cannot be accessed using smartphones.
These fixes are for Hotspot Shield running on Mac and Windows PCs and Laptops.

Fix 1: Restart Your PC

Though this is no fix, it can work at times. A Quick restart solves some of the annoying problems in PC. Something went wrong error may occur because the hotspot shield could not start properly and a restart might fix it.

Fix 2: Run Hotspot Shield Fix Me

Hotspot Shield Fix Me is an inbuilt application included in the installation file of the Hotspot Shield software. What it does is whenever a user faces a problem with Hotspot Shield, it runs itself to fix common problems.
If you have seen the error, it says, “Something went wrong, we are trying to fix it. It might take a dew seconds”. The software will run fix” me” application to fix the problem.
However, for an unknown reason, the Hotspot shield was unable to run the fix me program.
When I tried to run it manually, it finally fixed the something went wrong error. So, here is how to do it.
Close Hotspot Shield completely. Click on the Up-arrow icon in the taskbar, right-click on Hotspot Shield and select Quit.
hotspot-shield-quit
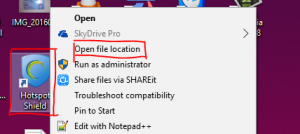
From your desktop screen, right-click on Hotspot shield icon.
Next, select open File Location. It will open the path location to C:\Program Files (x86)\Hotspot Shield\bin.
hotspot-shield-open-file-location
Here you have to search for the hssfixme.exe file.
hssfixme
Once you have found the file, double-click on hssfixme.exe to run it.
Note: If you don’t see hssfixme.exe file then click on View (at the top left) and check the option “Hidden Items” in show hide section.
Wait till the hssfixme.exe starts and fixes the problem. Once the problem is fixed, Hotspot Shield will start automatically.
There you have it. Now connect the hotspot shield to the internet and surf anonymously.

Fix 3: Reinstall Hotspot Shield

If nothing seems working, you can try reinstalling the Hotspot Shield. The problem could be with your hotspot shield software itself, and a reinstallation might just fix it.
Go to Control Panel >> Program >> Programs and Feature.
Select, Hotspot Shield, and select Uninstall.
Now reinstall Hotspot Shield, and see if the something went wrong error is fixed.

Fix Secure Connection Failed Error in Firefox & Chrome

Your Anti-Virus comes with a built-in feature to filter the SSL protocols for better safety. So, whenever you visit a HTTPS website using browsers like Firefox and Chrome, your Anti-Virus will try to filter them to create a secure connection. This is when you can face the “Secure connection failed” error message in Firefox and Chrome. Today, in this post, I will show you how to fix secure connection failed error message.
The error secure connection failed, only appear when you try to open any HTTPS website such as Gmail or Twitter or your internet banking site.
Now the error Secure connection failed does not appear because there is a problem with your Web browser. As the error can occur on any browser be it Firefox or Chrome or Edge, the culprit is something else.
In such cases even uninstalling and installing your web browser won’t help. So, don’t try doing it as a workaround.
The culprit here seems to be your Anti-Virus. For me, I am running the ESET Nod32 Anti-Virus, and the problem seems to be because of the Anti-Virus’s SSL Filtering Protocol feature.
So, if you are using the ESET Nod32 and are facing the Secure connection failed error, it is time to tweak some settings to get rid of this problem.  So, here is how to fix this problem in Firefox and Chrome.
Note: Even though I have mentioned Google Chrome and Firefox, the problem can occur on any web browser. Since it is an Anti-Virus program related issue, you can follow the steps to resolve this issue on any browser.

Why this Happens?

The only reason could be your Anti-Virus program not being able to import the root certificates due to some technical glitch. When the program cannot import root certificates, the website having secure protocols won’t be able to load on any web browser, because your Anti-virus will be blocking them. Ultimately showing the “Secure connection failed” error.

The Fix – Reset SSL Protocol Filtering

Fortunately, the fix is more simple than the error makes it appear to be. All you have to do is, reset the SSL protocol filtering feature in your Anti-Virus.
Note: These instructions are for ESET Nod32 Anti-Virus. If you are running any other Anti-Virus program, find the settings to turn off / on SSL protocol feature.
Note: I have also made a video showing how to fix the “Secure connection failed” error for easier understanding. You can skip the reading process and watch it by scrolling down to the end of this article.
Note: If you are facing the secure connection failed error on a non-HTTPS website, then you can try the fix it 2 in case the fix 1 doesn’t work.
Step 1: Begin by launching ESET NOD32 Anti-Virus program. If you are using it, you can open it from your system tray.
eset-nod32-sysem-tray-icon
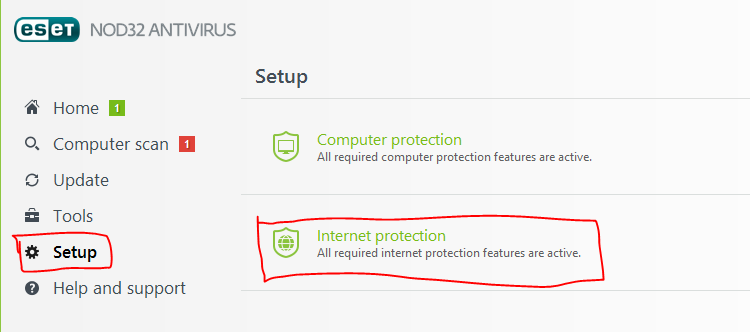
From the left pane, click and go to Setup. And then click on Internet Protection to expand the section.
If you are already in the Internet Protectionsection, then skip it.
eset-nod32-web-protection
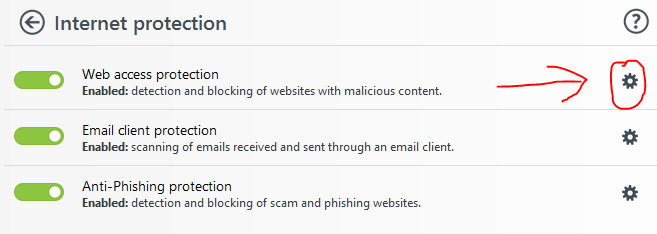
Click the Settings icon (Gear icon) beside Web Access Protection. It will open Advanced Setupwindow.
eset-node32-inetrnet-protection
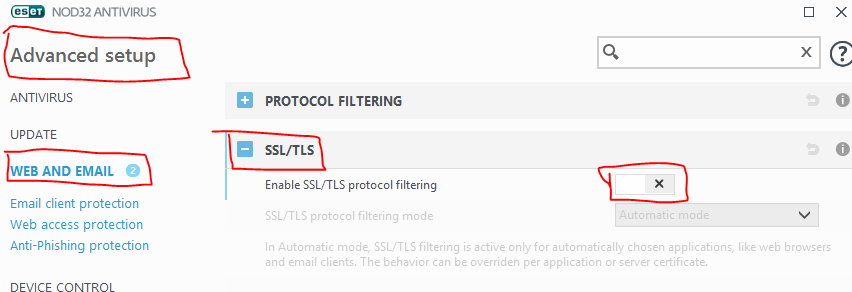
From the left-side pane, click Web and Email.
Next, expand SSL/TLS section by clicking on it.eset-nod32-off-ssl-filtering-protocol
Now toggle the slider beside “Enable SSL/TLS Protocol Filtering” to disable it. If all the options get grayed out, that means you have disabled it. Click OK to save the settings.
Step 2: Now you have to enable the SSL/TLS Protocol filtering feature again. So go to Advanced setup by navigating to Setup >> Internet Protection >> Web Access Protection (Click the Gear Icon) >> Web and Email.
eset-nod32-on-ssl-filtering-protocol
Now turn on “Enable SSL?TLS Protocol filtering” feature by sliding the toggle switch. Click OK button to save changes.
Now open Firefox or Google Chrome and try visiting any secure site to see if the secure connection failed error is resolved.

Fix 2: Fix Secure Connection Failed Error on Non-HTTPS Website

Now if you face the secure connection failed error while using a non-HTTPS website, then try this.
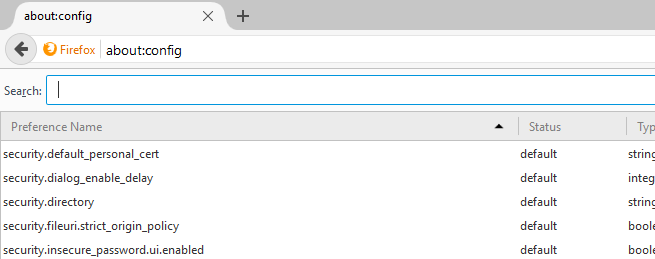
Open Mozilla Firefox. In the search bar, type  about:config and hit enter.
about-config-defaul
You will see “This might void your warranty” page. Click “I accept Risk” to proceed.
In the search bar, type security.ssl.enable_ocsp_stapling And hit enter. It will look for the entered query and return the result.
about-config-mozilla-firefox

Under the value tab, double click on security.ssl.enable_ocsp_stapling and you will see that the value has turned to False from True.

How to Install Selected Microsoft Office 2016/365 Programs in Windows 10

With the release of Microsoft Office 2010, Microsoft stopped using the traditional MSI installer for its Office programs installation and released a new installer called C2R Installer which stands for Click-to-Run installer.
One disadvantage of Click to Run installer is that it does not allow you to select what Office programs to install on your PC. Which means, the installer will download and install all the Microsoft Office programs whether you want them or not.
So, if you want to install only a few of Office programs such as Outlook, Word and PowerPoint but don’t want to install Access and other programs then that is not possible by default.
However, you can still customise click-to-Run installer options using an official Microsoft tool called “Office Deployment Tool“. Using this tool, you can force the installer to install only selected Microsoft Office programs without having to install all the office programs on your PC.
The tool is available for Microsoft Office 2013 and 2016, so the tool should work fine if you are using these versions of Microsoft Office on your PC.
What this tool does is it allows you to download the Microsoft Office files in your desired location and also allows you to customise the office programs that you want to install.
So, you can install the Microsoft Office programs of your choice and leave everything else that you don’t need and keep your PC clean. There are other few options offered by this tool, which you will read later in the post.
Now if you want to customise Office setup and want to install only selected office programs from the C2R (Click-to-Run) tool, follow these steps given below.

Customise Office 2016/365 Setup to Install Selected Programs

Begin with downloading the Microsoft Office deployment tool for Click-to-Run. As I said earlier, the tool is available for both the Office 2013 and Office 2016 versions.
Now you have to run and extract the tool on your PC. Run the downloaded file. If it asks to select a folder to extract the files, select any folder of your choice. Just make sure it is easier to access and you don’t keep searching the location when needed.
After extracting the file, it will create two files in the folder namely:
configuration.xml and setup.exe.
Now what we have to do is edit the configuration.XML file. It is the main file which you can use to tell the Microsoft Office installer about what programs you want to install, in which language and what programs to exclude.
Editing this file will force the office installer to install office programs according to your choice along with your preferences.
You can use the Notepad to edit this file as it is in .xml format. To edit the file, right-click onconfiguration.xml and select Edit. It will open the XML file in Notepad editor.
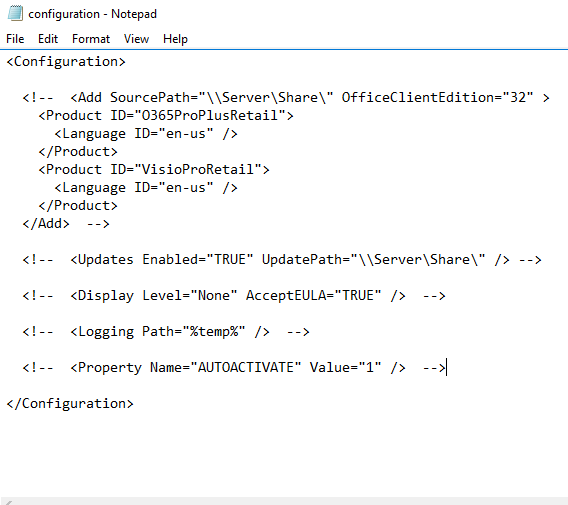
By default, the file contains very basic information about the setup that you can edit and save according to your preference. It will look something like this:


<!-- <Add SourcePath="\\Server\Share\" OfficeClientEdition="32" >
<Product ID="O365ProPlusRetail">
<Language ID="en-us" />

<Product ID="VisioProRetail">
<Language ID="en-us" />

-->

<!-- -->

<!-- -->

<!-- -->

<!-- -->

In the above code, you can change several things such as:
SourcePath = this is where the office setup files downloaded by the C2R installer will be saved. So you can keep the default source path or change it C:/ or E:/ (D:/) path of your choice.
OfficeCleintEdition = You can change the Office version to 32-bit or 64-bit as per your need.
Product ID= Here product ID is not product key but the variant of Office suite you want to install. By default, it is set to 0365ProPlusRetail, but you can change it to following:
ProPlusRetail
HomeStundetRetail
HomeBussinesRetail
etc.
Langauge = You can change the language which is set to US English by default. Setting it to hi-in will download Hindi India version of Office suite.
ExcludeApp ID = This the major part of this file. Adding the name of the program after ExcludeApp ID variable will not install that office program on your PC. More about this later in the article.
Now, we will edit the configuration.XML file to exclude unwanted Office programs from installation. Here is how to do it.

Install Select Office Programs only

Here you cannot select which program to install, but you can select which programs you don’t want to install. So, all you have to do is include the name of the program that you don’t want to install along with “Exclude” variable as shown below.
Example: If you don’t want to install Access andGroove Office programs on your PC, then type these two lines of code in the file.
<ExcludeApp ID=”Access” />
<ExcludeApp ID=”Groove” />
Now do this for all the programs that you want to exclude from office installation, and save the file by pressing Ctrl + S.
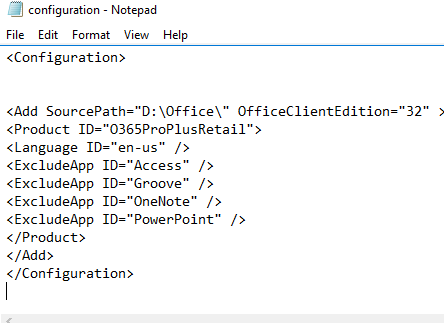
After editing the file, it will look something like this:


<Add SourcePath="D:\Office\" OfficeClientEdition="32" >
<Product ID="O365ProPlusRetail">
<Language ID="en-us" />
<ExcludeApp ID="Access" />
<ExcludeApp ID="Groove" />
<ExcludeApp ID="OneNote" />
<ExcludeApp ID="PowerPoint" />


You can replace your original configuration.XML code with the code given above. You can copy and paste it as it is. Add any program name that you want to exclude from Office setup and save the file.
I have removed other unnecessary code from the file, so you don’t have worry about that.

Download Office Setup Files

Once you have saved the edited .xml file, it is time to download the full office setup file using the setup.exe file that you got after extracting the Deployment file. However, simply don’t run the setup.exe file by double clicking on it as it will not work.
You have to run the setup file from the command prompt to make it work. So here is how to do it.
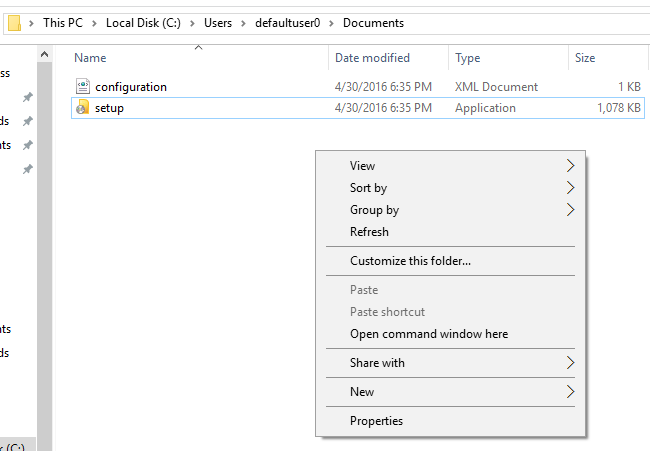
Navigate to the location where you have extracted the configuration.xml and setup.exe file. While inside the folder, press and hold Shift Key and right-click on an empty area inside the folder.
Select “Open Command window here” option. It will open command prompt window with the current directory active. In the command prompt window type the following command and hit enter.
setup.exe /download Configuration.xml
If everything went right, the setup.exe file will begin downloading the Office setup files.
A new folder called “Office” will be created by the installer in the directory that you had set in the configuration.XML file as “Sourcepath” while editing the file. If you navigate to that folder, you will see the downloaded Office setup files saved in the folder.
The downloading process will take some time depending on your internet connection. So, wait till the files are downloaded completely. As soon as the download will finish, the command prompt window will return to the current directory.

Install Office 2016/365 with Selected Programs

Now that you have downloaded the Office setup file, it is time to install it. During the installation, we will use the configuration.XML file again so that excluded programs in the file don’t get installed on your PC.
In the command prompt, run the following command and hit enter:
setup.exe /configure configuration.xml
Now the command will execute and start installing Microsoft office 2016/365 or 2013 on your PC. Wait till it installs it completely, then you can set up the Office with your login details and product key

How to Fix USB Device Not Recognized Error In Windows?

We often come across a situation when we Plug in our USB Device and we get the error USB Device Not Recognized in Windows. This is very irritating and can occur due to many reasons. There might be some partition issues on your External Storage device or the File System might be Corrupted. It is also possible that your USB driver may be corrupted, or it may be not responding. In the worst case scenario, chances are that your USB Drive has been damaged and is unreadable by the Device Drivers. In this post, we listed down all the possible solutions to solve USB Device Not Recognized Error In Windows-based Computer.

Different ways to Fix USB Device Not Recognized Error In Windows.

1.Check if the Device shows up in the Disk Management.

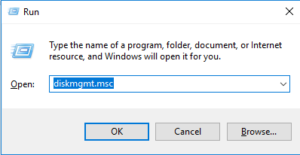
Run Dialog Box
To open Disk Management on your Windows Pc, Simple click Windows Key+R, this will open the Run Dialog Box, type diskmgmt.msc and Click on Open. This will open the Disk Management Console.
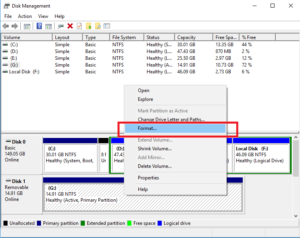
Disk Management
In the bottom left corner, you can see your all the external Drives attached to your Computer. If your device shows up then you simply need to format it properly so that Windows can recognize your USB device. If your USB DEvice doesn’t show up in the list, then you need to try other alternative methods mentioned below.

2. Unplug Your USB Device and Plug it Again into some Other USB Port

If Method 1 doesn’t work for you, then you may try unplugging your Device and try to Plug it again. You may also try to insert it into some other USB Ports available. This method often solves this USB Device Not Recognized issue because when you reconnect your USB Device, you are actually refreshing your List of Plugged in USB Devices. USB Ports may malfunction when they get older, so replugging it into other USB Port may solve this issue for you.

3. Formatting and Partitioning the Drive

The USB Device Not Recognized error can show up if your USB Device has not been partitioned properly.You can use Windows Disk Management Console to format and make proper partitions to your USB Drive. Just  follow the following Simple Steps:
  • Click Windows Key+R and type diskmgmt.msc. Tap enter and this will open Windows Disk Management Console.Disk Management
  • Locate your USB device at the bottom left corner and Right Click on it.
  • A new Dialog Box will open, Click on Format… Ignore the warning and proceed further.
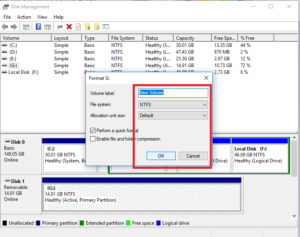
  • In the next Dialog Box, you will see an option to format your USB Device. Select the File System as NTFS and Allocation Unit Size as Default.Format USB Drive
  • Click on Ok and your Formatting will be completed within few seconds.
  • Remove your USB Drive and Plug it again. Now you should be able to see your USB Drive and use it without any error.
Please note that Formatting will erase all the data stored in your Device and you may not be able to restore it again.

4. Restart your Computer.

Sometimes, restarting your Computer may solve this problem with USB Device Not Recognized. When your Computer starts booting, it loads all the drivers and programs during the Boot Process. It might be possible that some drivers or programs failed to start during the Boot Process which is causing this error. Restarting your Computer Means soft Reset of your Computer and It resolves most of the common issues.

5. Updating The Device Driver

The USB Device Not Recognized error means that your Computer is unable to detect the USB Device attached to your Computer. Sometimes updating your Device Driver might solve this issue for you. You just need to perform these simple steps in order to update your Device Drivers.
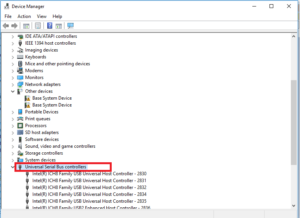
  • Click Windows Key+R and type devmgmt.msc. Hit Enter and it will open Device Manager Page in a new Window.
  • Scroll down to search for Universal Serial Bus Controllers and double-click on it.USB Device Not Recognized
  • You will see the unrecognized devices as Unknown Device. Right CLick on it and click on Properties.
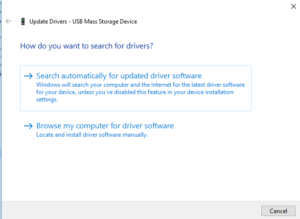
  • A new dialog Box will open as shown. Click on Driver Tab and tap on Update Driver.Update Drivers
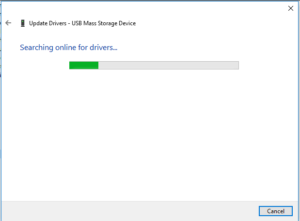
  • You can search for available drivers online or you can also manually select the driver software if available on your computer. However, it is highly recommended that you search for Available drivers online.Update Drivers
  • Click on Search Automatically for Updated Driver Software. It will automatically search and install the latest available driver available for your Device. This will surely solve your Driver issues if any.

6. Using Windows TroubleShooter

Windows TroubleShooter solves the majority of the Hardware related problems in Windows Operating System. It has improved a lot in Windows 10. To open Windows Troubleshooter,
  • Go-to Settings and click on hardware and other devices.
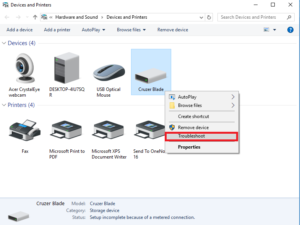
  • Select your USB Device from the list.Windows TroubleSHooter
  • Right Click on the Device Name and Click on TroubleShoot.USB Device Not Recognized
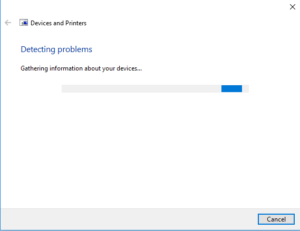
  • It will automatically detect the problems and get it solved for you.

7. Checking Physical Damage to your USB Device and Drive

If all the methods listed above doesn’t work for you, then chances are that your USB Device or USB Drive has been physically damaged. Check your Device and Drive for any physical defect. If found any, then you need to replace your Device/Drive.
These were some of the TroubleShoot methods to solve the USB Device Not Recognized problem in Windows-based Computer. We hope you were able to fix this issue by following the above steps. If the issue still persists you may comment down below or report the issue on the official on the Microsoft Community.

How to fix Error Code 0x8007232B?

iCloud Guide – Answer to you all ‘What’ and ‘how’ Queries!

How to fix Touch ID not working issue?

With the advancement of technology, many of the gadgets in the smartphone industry have undergone a certain change which is also the reason that many of the marketers (sellers & buyers) are enjoying and upgrading themselves too.  Apple’s who is the leading tech company is known for its iPhones, iPad, Smartwatches, MacBook etc. Though some of the smartphone models produced by the company have experienced some issues, which is related to the Apple’s Touch ID. So, if your Touch ID is not working, then here are few tips to fix it.

What basically is Touch ID?

It is a feature found on the iPhone, iPad, and MacBook which lets the user open the device by just the touch. Apple’s Touch ID is also useful for transactions with iTunes Store or App Store. Not all Apple device possesses the Touch ID, but models including iPhone 5s and higher have it along with iPad Air 2, iPad Mini 3/4 and iPad Pro both supporting the versions iOS 11.1/11/10.
Touch ID features:-
  • Use the feature ‘Rest finger to open’.
  • Make use of ‘Raise to wake’ feature in which one can unlock their iPhone with the Touch ID without pressing the home button. An important fact to know is that ‘Raise to wake’ feature works only for a limited number of models including iPhone version 7/7 Plus, iPhone SE and iPhone 6s Plus/6s.
  • If nothing suits you, then simply enter the Passcode and access your iPhone.
To avail benefits of Rest Finger to Open” feature, one needs to follow following steps:-
  1. Go to the settings tab.
  2. Click on Accessibility.
  3. Select Home Button
  4. Finally, choose ‘Toggle Rest Finger to open’ to ON.
To avail benefits of “Raise to wake” feature, one needs to follow following steps:-
  1. Click on Settings tab
  2. Choose ‘Display and Brightness’
  3. Shift ‘Raise to wake’ to ON.

How does Touch ID work?

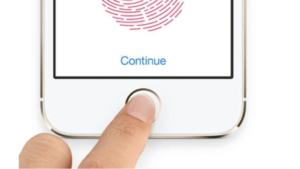
There is a ring around the sensor involved in Touch ID, which when detects a finger, triggers a function that captures a high-resolution image of the finger.
touch id not working
The data generated through finger capturing is transformed into a mathematical representation and sent via a secured enclave. If the representation matches, an affirmative response is being displayed letting the user access the device.
If the finger captured generating the mathematical representation denies the authorization, the user cannot enter the system. Moreover, this is a self-improving process as it recognizes the fingerprint once entered.

Troubleshooting the Touch ID issue

  1. Make sure that complete surface is properly scanned during the first stage of registration and all the edges of the finger are scanned during the second phase of the registration.
  1. Take special care that no moisture is there on the finger or the sensor. To ensure this doesn’t happen, wipe both the surfaces cleanly with a clean, static-free cloth.
  1. The correct position to scan the finger is that there should be proper contact with the metal ring as well the home button during the scanning process.
  1. Despite the lightning speed of the iOS, resist from lifting the finger too fast during the scan.
  1. Refrain from putting too much pressure on the home button and capacitive ring as it can cause problems in effective registration of the fingerprint.
  1. Instead of scanning just one finger, register at least 2 fingers of both the hands for backup.
  1. In case of any error mid-process, delete the fingerprint and restart the process (Virat PC) or it may trouble in the later stages.
  1. If the iPhone is protected with a screen guard or a protective case, pay special attention that it doesn’t block the home button or the capacitive ring, as it can trouble with the functioning of the Touch ID.
  1. Try force restarting the iPhone or iPad if trouble still exists using the home button along with Sleep/Wake button.
  1. Toggle on and off the Touch ID option to temporarily enable and disable the service.
  1. There can also be a possibility that due to the use of faulty chargers; the interface acts abnormal causing Touch ID to not function properly.
  1. In that case, check the charger being used to charge the iPhone/iPad and make sure that it is an original and genuine one from Apple that came with the iPhone/iPad.
  1. If not, avoid usage of the faulty charger as in the long run, it may cause severe damage to the device.
  1. If nothing works, try resetting the phone without any data loss with the help of a tool.

How to fix Touch ID issue with tools?

If none of the above works, there is a possibility of a software issue in the iPhone. To resolve this, a system recovery tool, iMyFone D-Back can be used. This tool has a ‘Fix iOS System’ option that can fix various problems of the iOS without any data loss.
touch id not working
Besides this, it also enables data recovery from iPhone/iPad and even restores the backup files present in iCloud or iTunes.
Fix iOS System has 3 modes, The modes are:
  1. Standard Mode
  2. Advanced Mode
  3. Exit Recovery Mode
Using the standard mode one can resolve the Touch ID issue effectively without any data loss.
Steps to resolve Touch ID issue using iMyFone D-Back
  • Run the tool.
  • Select the option ‘Fix iOS System’
  • Choose the Standard Mode
  • Download the suitable firmware
  • Click on ‘Start To Fix’

How to Fix Page Fault In Nonpaged Area: Best Fixes?

How to Automatically Lock Windows PC with Dynamic Lock?

Many of us use Windows Operating System for our PC and you might be aware of many security features that Windows provide. But this dynamic lock feature that Windows provides in their latest updates may be new for you all. This feature will prevent your system access to the anonymous user and protects your data. Automatically Lock Windows PC with Dynamic Lock can’t be used for full protection of the PC as this is an extra security addition to your PC.
Now you will be wondering that how it will work. However, to enable this feature on your PC you need a device having Bluetooth in it which is always with you. Generally, the first choice for this is our phones as almost every phone comes with inbuilt Bluetooth in it. The dynamic lock feature depends on the range of Bluetooth device as it may vary according to the manufacturer of the device. The method is quite simple you just need to follow the step by step procedure shown below.

Steps to Automatically Lock Windows PC with Dynamic Lock:

Step 1: Firstly you need to pair a Bluetooth device and connect it to your PC which is going to be used by the Dynamic lock. As already mentioned use a device which is always with you normally your phone.
Automatically Lock Windows PC
Read Also: How to Fix Unable to Turn On Windows Defender in Windows
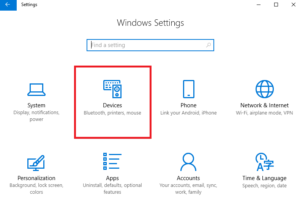
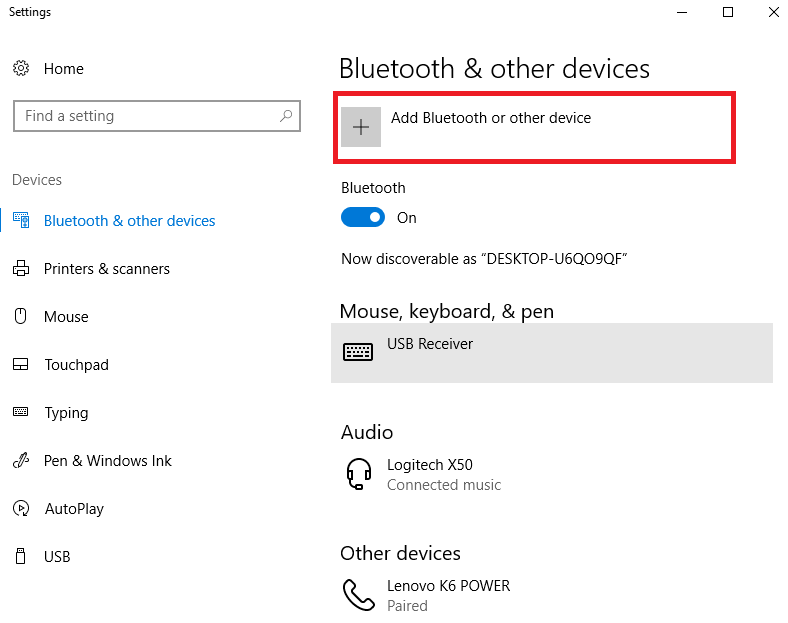
Step 2: To pair the Bluetooth device to your Windows system. You just need to go to Windows Settings -> Device -> Bluetooth & other devices. Then click on Add Bluetooth or other device. Then searching for the device starts make sure that the device which you are using its Bluetooth is turned ON for pairing.
Automatically Lock Windows PC
Step 3: After pairing the device you need to enable dynamic lock feature. This dynamic lock feature is not available in older versions of Windows 10. So, ensure that you are using the latest version of Windows and have this functionality in it.
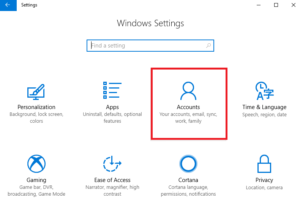
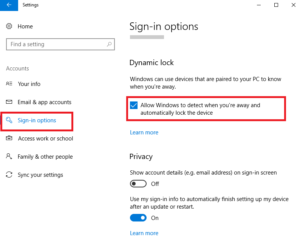
Step 4: For enabling this feature you just need to go to Settings -> Accounts -> Sign-in options. Then scroll down below and you will see the option Dynamic lock and click the box aside of  “Allow Windows to detect when you’re away and automatically lock the device” option. This will detect the Bluetooth connected device to the system to lock the PC whenever the Bluetooth device goes out of range.
Automatically Lock Windows PC
However, this feature is good for enhancing the security of the PC but it won’t be useful for Home users. This will be more useful for professional users who are working in offices where users go away from the PC. You must be thinking that if the Bluetooth device goes out of range the PC gets locked. Then in the similar way if Bluetooth device again came back in range the PC will be unlocked. Then the answer is no it won’t work that way.
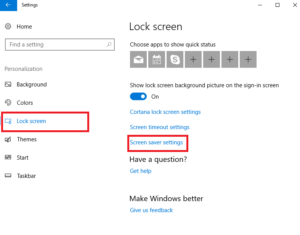
Won’t have updated version of Windows 10 or don’t want to rely on dynamic lock feature that uses Bluetooth device. then you have the alternate option which is quite simple and you should be familiar with it. That is Auto lock using the screen saver.

Home How To How to Automatically Lock Windows PC with Dynamic Lock

How to Use Stinger?

So guys, We Gyan Fever is back with new methods how to 
Use stinger.

McAfee Stinger is a standalone utility used to detect and remove specific viruses. It is not a substitute for full anti-virus protection, but a specialized tool to assist administrators and users when dealing with infected system. Stinger utilizes next-generation scan technology, including rootkit scanning, and scan performance optimizations. It detects and removes threats identified under the “Threat List” option under Advanced menu options in the Stinger application.

McAfee Stinger now detects and removes Game Over Zeus and Crypto Locker. Learn more.

How do you use Stinger?

  1. Download the latest version of Stinger
  2. When prompted, choose to save the file to a convenient location on your hard disk, such as your Desktop folder.

  3. When the download is complete, navigate to the folder that contains the downloaded Stinger file, and run it. 

  4. The Stinger interface will be displayed.


  1. By default, Stinger scans for rootkits, running processes, loaded modules, registry and directory locations known to be used by malware on a machine to keep scan times minimal. If necessary, click the “Customize my scan” button to add additional drives/directories to scan.
  2. Click the Scan button to begin scanning the specified drives/directories.
  3. By default, Stinger will repair any infected files it finds.
  4. Stinger leverages GTI File Reputation and runs network heuristics at Medium level by default. If you select “High” or “Very High,” McAfee Labs recommends that you set the “On threat detection” action to “Report” only for the first scan. 


    To learn more about GTI File Reputation see the following KB articles

    KB53735 – FAQs for Global Threat Intelligence File Reputation

    KB60224 – How to verify that GTI File Reputation is installed correctly

    KB65525 – Identification of generically detected malware (Global Threat Intelligence detections)

Frequently Asked Questions

Q: I know I have a virus, but Stinger did not detect one. Why is this?
A: Stinger is not a substitute for a full anti-virus scanner. It is only designed to detect and remove specific threats.
Q: Stinger found a virus that it couldn’t repair. Why is this?
A: This is most likely due to Windows System Restore functionality having a lock on the infected file. Windows/XP/Vista/7 users should disable system restore prior to scanning.
Q: Where is the scan log saved and how can I view them?
A: By default the log file is saved from where Stinger.exe is run. Within Stinger, navigate to the log TAB and the logs are displayed as list with time stamp, clicking on the log file name opens the file in the HTML format.
Q: Where are the Quarantine files stored?
A: The quarantine files are stored under C:\Quarantine\Stinger.
Q: What is the “Threat List” option under Advanced menu used for?
A: The Threat List provides a list of malware that Stinger is configured to detect. This list does not contain the results from running a scan.
Q: Are there any command-line parameters available when running Stinger?
A: Yes, the command-line parameters are displayed by going to the help menu within Stinger.
Q: I ran Stinger and now have a Stinger.opt file, what is that?
A: When Stinger runs it creates the Stinger.opt file that saves the current Stinger configuration. When you run Stinger the next time, your previous configuration is used as long as the Stinger.opt file is in the same directory as Stinger.
Q: Stinger updated components of VirusScan. Is this expected behavior?
A: When the Rootkit scanning option is selected within Stinger preferences – VSCore files (mfehidk.sys & mferkdet.sys) on a McAfee endpoint will be updated to 15.x. These files are installed only if newer than what’s on the system and is needed to scan for today’s generation of newer rootkits. If the rootkit scanning option is disabled within Stinger – the VSCore update will not occur.
Q: Does Stinger perform rootkit scanning when deployed via ePO?
A: We’ve disabled rootkit scanning in the Stinger-ePO package to limit the auto update of VSCore components when an admin deploys Stinger to thousands of machines. To enable rootkit scanning in ePO mode, please use the following parameters while checking in the Stinger package in ePO:
–reportpath=%temp% –rootkit
For detailed instructions, please refer to 
Q: What versions of Windows are supported by Stinger?
A: Windows XP SP2, 2003 SP2, Vista SP1, 2008, 7 and 8. In addition, Stinger requires the machine to have Internet Explorer version 8 or above.
Q: What are the requirements for Stinger to execute in a Win PE environment?
A: While creating a custom Windows PE image, add support for HTML Application components using the instructions provided in this .
Q: How can I get support for Stinger?
A: Stinger is not a supported application. McAfee Labs makes no guarantees about this product.
Q: How can I add custom detections to Stinger?
A: Stinger has the option where a user can input upto 1000 MD5 hashes as a custom blacklist. During a system scan, if any files match the custom blacklisted hashes – the files will get detected and deleted. This feature is provided to help power users who have isolated a malware sample(s) for which no detection is available yet in the DAT files or GTI File Reputation. To leverage this feature:
  1. From the Stinger interface goto the Advanced –> Blacklist tab.
  2. Input MD5 hashes to be detected either via the Enter Hash button or click the Load hash List button to point to a text file containing MD5 hashes to be included in the scan. SHA1, SHA 256 or other hash types are unsupported.
  3. During a scan, files that match the hash will have a detection name of Stinger!. Full dat repair is applied on the detected file.
  4. Files that are digitally signed using a valid certificate or those hashes which are already marked as clean in GTI File Reputation will not be detected as part of the custom blacklist. This is a safety feature to prevent users from accidentally deleting files.
Q: How can run Stinger without the Real Protect component getting installed?
A: The Stinger-ePO package does not execute Real Protect. In order to run Stinger without Real Protect getting installed, execute Stinger.exe –ePO.